Background
jLogo Programming
- Commanding a Turtle
- Pseudocode
- Adding New Commands
- Iteration & Animation
- Hierarchical Structure
- Procedure Inputs
- Operators & Expressions
- Defining Operators
- Words & Sentences
- User Interface Events
- What If? (Predicates)
- Recursion
- Local Variables
- Global Variables
- Word/Sentence Iteration
- Mastermind Project
- Turtles As Actors
- Arrays
- File Input/Output
- AI: Pitcher Problem Solver
Java
- A Java Program
- What's a Class?
- Extending Existing Classes
- Types
- Turtle Graphics
- Control Flow
- User Interface Events
Appendices
- Jargon
- What Is TG?
- TG Directives
- jLogo Primitives
- TG Editor
- Java Tables
- Example Programs
- Installation Notes
Updates
- December 13, 2008
- January 6, 2012
- March 15, 2013
- January 20, 2014
- February 13, 2014
- July 29, 2014
- January 18, 2016
- January 29, 2016
Lastly
User Interface Events
Introduction
In this lesson, you will learn
- how to do something when input events occur. Events covered are keyPressed (when a key on the keyboard is pressed), mouseClicked (when the left button on the mouse is pressed), and mouseMoved (when the mouse is moved within the graphics canvas), and
- how to get the X and Y coordinates where the mouse was when its left button was clicked.
The User Interface
These days, most of the interaction with a computer or any device with a computer in it, is via what's called a Graphical User Interface. In computer-speak it's commonly called the GUI, (pronounced goo-ee).
On a deskside computer system, the GUI provides ways for you to launch programs, display stuff, etc... all with a mouse pointing device. When you are interacting with programs, you use a pointing device (a mouse) to open up menus, choose items from the menus, check boxes that determine how your program should do things. It's a point-and-click environment. When it is time to enter text, you have a physical keyboard or virtual one on your device's display.
On a calculator or mobile phone, much of the interaction is done with buttons - buttons for numbers, menu buttons, arrow buttons for moving around within the menu system. For text entry, sometimes the buttons are used, but many devices have tiny key pads.
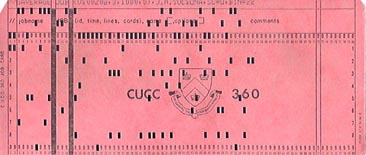
The first two computers I got to program used cardboard cards with rectangular holes in them for input. Figure 11.1 shows what a punched card. looks like. I typed my program source code onto these cards. Data processed by programs could be input on these cards.
 |
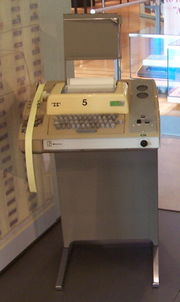
But, by the time I got my first job, my interface was through a Model 33 Teletype terminal. This was a major step forward! I could actually interact with the computer, not submit cards (something for it to do) and then wait for some printer output. Figure 11.2 shows a Model-33 Teletype, like the one I used for years. Note the yellow paper-tape reader/punch device it has on its left side. Punched paper tape was used similarly to cards.
 |
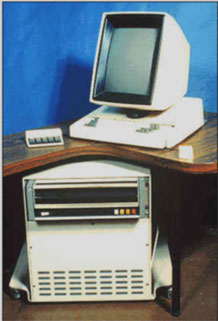
By the 1970's, this magical kingdom in the world of computer science appeared, commonly called PARC. Actually it is Xerox PARC (PARC stands for Palo Alto Research Center) and it still exists. A group of scientists there built what was to be the future of computing: networks of "personal" computers were prototyped. Much of what you see on a computer these days, the user interface, was invented at PARC. The researchers all had computers (Altos) with high-resolution graphics displays and a pointing device (a mouse). The mouse, or "X-Y position indicator for a display system" which is what it was originally called, was invented by Doug Engelbart at SRI (Stanford Research Institute) in the early 1960's. The computers the researchers used were connected by a high-speed network (Ethernet). They used this environment that they built themselves to do all of their work. Figure 11.3 is a picture of an Alto workstation.
 |
The first fancy integrated user interface that was built for the Alto (that's most applicable to what I want to talk about) was Alan Kay's vision of Dynabook. Alan and a few other researchers including Adele Goldberg and Dan Ingalls, built a graphically-oriented system for working with Personal Dynamic Media, a programming environment they called Smalltalk. The Smalltalk system introduced a new concept of breaking the graphical display into pieces called "windows" which held separate information. As I can fit concepts from this system into our learning, I will.
We've been doing lot's of graphical output, now it's time to interact with a user - to get some input via your computer systems' GUI. In the following few sections I cover events that your program can respond to. The events that jLogo supports are keyPressed, keyReleased, keyTyped, mouseClicked, and mouseMoved. I'm going to start with the mouse since it is the most fun!
Responding to a mouseClicked Event
A mouse is simply a pointing device which sends the computer motion information. For a long time, the most common kind of a mouse had a little ball that rotated when you moved it across a surface. As you moved the mouse from side to side and forward or backward, this motion information was sent to the computer. The GUI uses this information to keep track of a point where the mouse was. These days we have mice with lasers in them; on notebooks and phones we have touch sensitive pads that track finger movements. But what happens is still the same, movement information is captured and passed on. It is the job of the GUI to give you feedback, usually in the form of a graphical icon, often an arrow.
A mouse also has buttons on it. It tells the computer when you press a button down and when you release it. When this down-up motion is done quickly it's called a mouse-click. Low-level GUI software communicates that a mouse-click has occured to higher-level programs, like TG, in the form of an event.
The TG program receives an event when a mouse button is clicked. If you define a procedure named mouseClicked it will be performed when a mouse-click is detected in the graphics canvas (*note* left button). Type in the following definition of mouseClicked into the TG applet's Editor to try it out.
|
TG Programming Environment Applet
Click the left button on the mouse in the graphics canvas a few times and watch what happens...
mouseClicked - Three Flavors
You have just experimented with one of three flavors mouseClicked is available in. When you define your mouseClicked procedure, you can choose to have the mouse's location information provided as an input or inputs. Here are the other two possibilities.
|
Modify the definition of mouseClicked you typed into TG's Editor so that it matches one of these new flavors. Do a little clicking in the graphics canvas. Try out the other flavor.
*NOTE* you can not have multiple definitions of the same procedure name in a program. Only the last one will really exist; the others are replaced by the last one parsed/interpreted.
Following mouseMoved Events
To track movement of the mouse on the graphics canvas, all you need to do is define a procedure with the name mouseMoved.
Play scientist and explore how mouseMoved works. Start off with the same initial procedures we wrote to explore mouseClicked. Then try the other flavors that, like mouseClicked, have either a single input (a sentence with x an y values) or two inputs, :x and :y.
|
Then, work through the same practice stuff. Modify the procedures you wrote for exploring mouseClicked such that they invoke mouseMoved instead of mouseClicked.
(MOUSEX,MOUSEY)
Where the Mouse Is
What if you just want to know where the mouse is right now?
Introducing... the operators mousex and mousey. These two operators output the coordinates where the mouse was when the operating system last passed a mouseClicked or mouseMoved event.
Responding to keyPressed Events
Just like the way mouseClicked and mouseMoved provide access to mouse events, keyPressed can get you events generated when a key on the keyboard is pressed. If you define a procedure with the name keyPressed that has one input (a number), it will be performed when a key is pressed.
Go back up to the TG applet and type in the following definition of keyPressed.
|
Once you have this entered, click the mouse on the graphics canvas, and then press a few different keys on the keyboard.
But what good are numbers for keyPressed events? Why doesn't keyPressed provide the character pressed?
Well... because not all keys on a keyboard have a character that represents them. For example, all keyboards have arrow keys. Table 11.1 details the key number values.
| Key Number | Character Key | Key Number | Action Key | |
| 0 - 31 | Control Characters |
65536 | Up Arrow | |
| 8 | Backspace | 65537 | Down Arrow | |
| 9 | Tab | 65538 | Left Arrow | |
| 10 | Enter | 65539 | Right Arrow | |
| 27 | Esc | 65540 | Alt | |
| 32 - 127 | ASCII Characters |
65541 | Control | |
| 65542 | Shift | |||
| | ||||
Remember, Logo has an operator that converts an ASCII standard code number into a character (char).
Change your keyPressed procedure to print the character.
Projects
LabelPoints
Write a program, LabelPoints, that labels points on the graphics canvas when you click the mouse in the graphics canvas. Try in out in the following window.
| LabelPoints |
|---|
KeyPressedLabels
Write a program, KeyPressedLabels, that
- has a mouseClicked procedure which moves the turtle to where the mouse is clicked and draws a little caret cursor to indicate where it's at,
- has a keyPressed procedure which uses char, and label to draw the character representation its input. After drawing the character, erase the cursor, move the turtle over to the right (so that it is ready for another character, and draw a new cursor.
Here is an applet that shows the desired behaviour. Click in the window to give if keyboard focus, then type a few characters. Then click the mouse somewhere else and type a few more characters. Repeat...
| KeyPressed Labels |
|---|
Eyes
Write a program, Eyes, that draws a pair of eyes centered on the graphics canvas. As you move the mouse around on the graphics canvas, make the pupils in the eyes follow the mouse. Here is an applet that shows the desired behaviour.
| Eyes |
|---|
Hint: This is a challenging little program that involves geometric scaling and translation. A nice way to start is to first get a single eye centered at 0,0 working. This eliminates the translation step.
Hint: Think scaling. Horizontal scaling is canvaswidth compared with eye width (white part) vertical scaling is canvasheight compared with eye height (white part). Click on this link to view a Kahn Academy video demonstrating scaling. To find other explanations on the net or on YouTube, search for the phrase "geometric scaling".
Yet Another Grid Extension
In this lesson we have learned how to capture and respond to mouse and keyboard events. We can now write programs that react to user input. Our GridToolkit is coming along, its utility growing. Take a minute of two and think: "what kind of funtionality should we add to our GridToolkit given mouse and keyboard input?"
A surprising amount of the content in these lessons, many projects, have come from student input. And this example is no different. A student wanted to write a program that included interaction with a grid. One of the things she needed was the ability to map mouse positions to the cells in her grid. Together, we wrote the procedure she needed. Although she only needed this one procedure, it would be a mistake to simply add her solution to a toolkit that may be used in many programs. Good software engineers think about generality.
In the grid toolkit there are two ways to identify a cell. Here are the procedures we ended up writing and including in an extended GridToolkit.
|
Add these procedures to your own GridToolkit, or here is a version of GridToolkit that includes them. Read through these procedures to understand how they work. This is an important part of learning to program. It you need to, draw plumbing diagrams to help you understand what the instructions do. As an example Figure 11.4 shows a plumbing diagram for the body of gridXtoColNum.
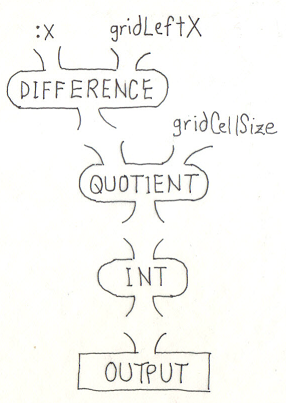 |
This can help you describe what the instruction does.
- DIFFERENCE outputs the number of turtle steps the input :x is from the left edge of the grid.
- QUOTIENT takes this value and divides it by the width of a cell to arrive at a column position and outputs it.
- INT removes the fractional part of this value and outputs an integer column number.
- Finally, this value is OUTPUT from gridXtoColNum.
Another way to help understand a procedure is to play with it in the CommandCenter. Figure 11.5 shows one possible way of watching what happens when gridXtoColNum is invoked with a variety of inputs.
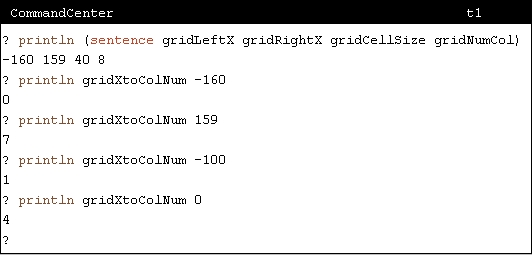 Figure 11.5
- First I printed out the values of stuff associated with the grid and columns.
- Next I printed out the column number for the leftmost X value of the grid. It's zero which is correct.
- Next I printed out the column number for the rightmost X value of the grid. It's seven, correct since there are 8 columns in the grid.
- Next I computed in my head what X would be for the middle of second column (-160 plus a column width, plus half of a column width = -100). When I invoked gridXtoColNum with -100 as its input, it output 1 - correct.
- Finally I tried an input of 0, the middle of the grid. With eight columns there should be four columns to the left of this point (0-3) and four to its right (4-7).
Here is another example. Figure 11.6 shows the plumbing diagram for gridIndexForXY.
 |
This can help you describe what the instruction does.
- gridYtoRowNum outputs the row number (zero for top row) given a Y coordinate.
- PRODUCT multiplies this row number by the number of columns in the grid (gridNumCol) and outputs the value. This is the index for the leftmost column in the row. This is input to SUM.
- gridXtoColNum output the column number (zero for leftmost column) given an X coordinate. This is the second input to SUM.
- SUM adds its inputs, outputing the index of the cell for the X,Y point that were gridIndexForXY's inputs.
- Finally, this value is OUTPUT from gridIndexForXY.
Ok, I've given you a couple of plumbing diagrams and descriptions of the new grid toolkit procedures. It's your turn. Pick a couple of the remaining procedures, draw their plumbing diagrams, and write up descriptions of what they do. Check what you've done here.
Practice: GridToolkit Paint Program
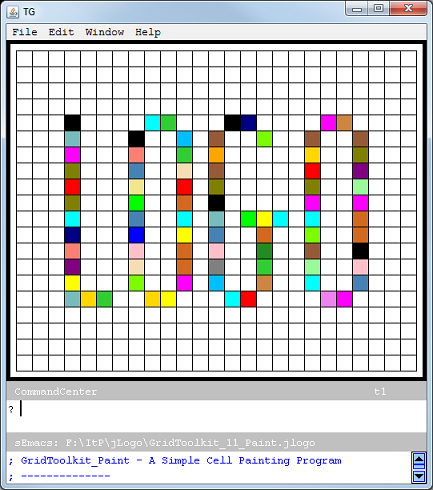
Write a program that extends your new GridToolkit to create a simple prototype of a cell painting program. Checkout the example Paint program I wrote - available here.
Your program should fill a cell with color when the cell is clicked on. The program I wrote consisted of the GridToolkit and main and mouseClicked procedures. main initializes the graphics canvas, painting the grid on it. My mouseClicked used a procedure in the GridToolkit to convert the mouse's position from X and Y coordinates to a cell's row and column numbers. Finally I filled this cell with a random color.
In my program I also changed gridCellSize to output 20 instead of 40, changed gridNumCol to output 25 instead of 8, and changed gridNumRow to output 20 instead of 5.
Figure 11.7 shows what I came up with.
 |
Have some fun... play around... add a mouseMoved procedure which fills the cell under the mouse with a random color.
Oh no... there's a bug in our program. Did you find it? If you click outside the grid, either the wrong cell gets filled or a filled box appears outside of the grid. The *note* in the comments for the new procedures warned us.
    ;*note* the X and Y coordinates are assumed to be within the bounds
    ;       of the grid.
We should have checked to make sure the mouse's X and Y coordinates were in the grid. We should only invoke gridIndexForXY or gridRowColForPos when we know they are. But we do not know how to do this yet... to only execute instructions when some condition exists, when something is true.
What timing! You will learn about conditional execution in the next lesson.
Summary
In this lesson, you learned about the events that TG will pass on to your programs if you want to know about them. They are:
- when the mouse is clicked on the graphics canvas. Your program can do something by defining a procedure named mouseClicked.
- when the mouse is moved around on the graphics canvas. Your program can do something by defining a procedure named mouseMoved. The mouse must have been previously clicked on the graphics canvas to activate it.
- when a key is pressed on the keyboard. Your program can do something by defining a procedure named keyPressed . The mouse must have been previously clicked on the graphics canvas to activate it.
You learned about the mousex and mousey operators which output the X and Y values for the coordinate where the mouse was when it was clicked or moved.
And, finally, I snuck in another example of hierarchy - did you catch it? The Events structure... Here's an example of it's layers for mouse events:
|
Highest Level |
Programs you write in jLogo which contain mouseClicked and/or mouseMoved |
| TG, written in Java gets Events from OS, can pass them to programs written in jLogo | |
|
OS (Operating System, e.g. Windows, Linux), gets binary
data from the mouse, converts it into Events, and provides these to programs running on the OS |
|
|
Lowest Level |
Hardware... the mouse, the interface (e.g. USB port) it
plugs into, the logic (chips) in them, LEDs, optical sensors, mechanical wheels, switches, etc... |
Procedures Introduced in This Lesson
| Name | Input(s) | Description |
| KEYPRESSED | keyNumber | When a keyboard key is pressed, TG receives an event. If the key is one that TG is interested in, a user-defined procedure with the name keyPressed (expecting one input) is invoked if it has been defined. |
| MOUSECLICKED | When a mouseClicked Event is received by the TG program, if it is the left-button and it is in the graphics canvas, TG invokes a user-defined procedure with the name MOUSECLICKED if one has been defined. | |
| MOUSECLICKED | xCor yCor | Similar to MOUSECLICKED defined without inputs, but the location of the mouse at the time of the click is provided in an X-coordinate input and a Y-coordinate input. |
| MOUSECLICKED | posSentence | Similar to MOUSECLICKED defined without inputs, but the location of the mouse at the time of the click is provided as a two-number sentence input. The first number is the X-coordinate and the last number is the Y-coordinate (see POS operator). |
| MOUSEMOVED | When a mouseMoved Event is received by TG, it performs a user-defined procedure named mouseMoved if one has been defined. mouseMoved Events only happen when the mouse is in an active graphics canvas. | |
| MOUSEMOVED | xCor yCor | Similar to MOUSEMOVED defined without inputs, but the location of the mouse at the time of the mouseMoved Event is provided in an X-coordinate input and a Y-coordinate input. |
| MOUSEMOVED | posSentence | Similar to MOUSEMOVED defined without inputs, but the location of the mouse at the time of the mouseMoved Event is provided as a two-number sentence input. The first number is the X-coordinate and the last number is the Y-coordinate (see POS operator). |
| MOUSEX | Outputs the X-coordinate where the mouse was when it was last clicked or moved within the graphics canvas. | |
| MOUSEY | Outputs the Y-coordinate where the mouse was when it was last clicked or moved within the graphics canvas. |
Go to the Table of Contents
On to Predicates, aka Conditional Execution
