Background
jLogo Programming
- Commanding a Turtle
- Pseudocode
- Adding New Commands
- Iteration & Animation
- Hierarchical Structure
- Procedure Inputs
- Operators & Expressions
- Defining Operators
- Words & Sentences
- User Interface Events
- What If? (Predicates)
- Recursion
- Local Variables
- Global Variables
- Word/Sentence Iteration
- Mastermind Project
- Turtles As Actors
- Arrays
- File Input/Output
- AI: Pitcher Problem Solver
Java
- A Java Program
- What's a Class?
- Extending Existing Classes
- Types
- Turtle Graphics
- Control Flow
- User Interface Events
Appendices
- Jargon
- What Is TG?
- TG Directives
- jLogo Primitives
- TG Editor
- Java Tables
- Example Programs
- Installation Notes
Updates
- December 13, 2008
- January 6, 2012
- March 15, 2013
- January 20, 2014
- February 13, 2014
- July 29, 2014
- January 18, 2016
- January 29, 2016
Lastly
Local Variables
Introduction
Since the Procedure Inputs lesson, you have been using one kind of variable. Inputs allow you to write procedures which do the same sort-of thing, but any single execution of the procedure results in action that depends upon a value or values that you provide when you invoke the procedure.
As examples, you have written procedures that drew varying sized boxes and drew houses with different heights and widths at different locations, all specified via inputs. You've used inputs along with recursion as an advanced form of iteration to draw trees and a Koch snowflake. And we have continued to enhance our Grid Toolkit to allow a wide variety of ways to manipulate any cell in the grid.
In this lesson, you will learn about a new kind of variable that can be declared inside your procedures. We will look at what a local variable is and why we occasionally need them.
I start off with an example where a local variable is used to save the day, fixing a bug in a simple drawing program. This is followed by walking through the process of writing a program which is a bits-vs-atoms copy of some art stuff I did as a child - stringart. In it, a local variable is used similarly to the way one was used in the first example. Then, I'll get you started on an exercise where you can extend the tree program you wrote in the last lesson. With a local variable, you can draw trees that are much more real looking.
Local Variables - What Are They?
Variables in programming languages are simply containers which hold values. Access to variables and the contents of them is through their name, also know as their identifiers.
Inputs are variables that are created and filled with values when a procedure is invoked. The names of the variables, are given on the procedure's title line. These identifiers can be used in the instructions which make up the body of the procedure. Inputs are also called local variables - they are local to the procedure in which they are defined.
Just to refresh your memory, given:
|
the first three lines are the definition of the procedure box, which includes an input, :size. A value is placed in the variable (think container) named size when the procedure box is invoked. The last line in this example shows an invocation of box. In this case, 100 is the value that's being supplied for the :size variable.
So you have been using variables since Lesson 7 (Procedure Inputs). What additional capabilities do extra local variables give us?
Project: A Simple Drawing Program
Let's write a very simple drawing program. Here is what we want it to do in its initial implementation.
Draw Applet
So, what you do is click the mouse in the window where you want the turtle to move to. The turtle either just moves or draws a line, based on the current state of the pen. Play with the applet a bit to get a feel for it...
Explore an Incomplete Version of the Program
You know how to do almost everything needed to write this program. If you have the TG programming environment on your computer, click here to get the code which you can copy/paste into the Editor. Otherwise, here is the TG applet. Use the loadcode directive in the CommandCenter to get Draw_0.jlogo into the Editor.
TG Programming Environment Applet
Check it out; read through the code. Play with it a bit. It has a bug in it. You can move the turtle around by clicking the mouse at various spots in the window, but when you click on the PenDown button, the turtle is moved to the button. This is not what we want... What's wrong? Can you find the code this is causing this behavior? If so, how can we fix the problem?
Debugging Software Programs
        When you have exhausted all possibilities, remember this:
        You haven't.
                                          ( - Thomas Edison)
Debugging a program is done in steps that match the Scientific Method.
- Observation,
- Hypothesize,
- Make predictions, and
- Test
Starting with observation, if you play with the program, you can get a few clues as to what the bug is. When you click on the PenUp/Down button, the turtle moves to the button instead of remaining where you've chosen to start or stop drawing a line. If you click the mouse outside of the PenUp/Down after clicking on it to lower the pen, you'll see that the line starts at the base of the letter "P" of the "PenUp" text. So, our hypothesis is that the program is moving the turtle to redraw the button with new text (changing "PenDown" to "PenUp") and leaves it there - our bug!
You have multiple ways of going through the last two steps: predicting and then testing your prediction.
What I would do first is to get acquainted with the program, browse through it to get a feel for its structure. I might draw a program structure diagram like Figure 14.1. This would give me hints about which parts of the program I should read more carefully, to try to find what needs to be changed.
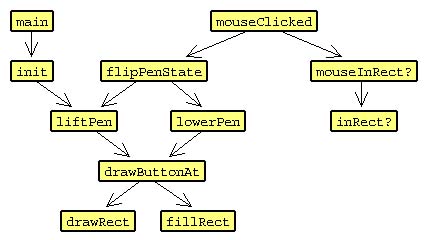 Figure 14.1
Another way is to search the program for where the PenUp/PenDown button is drawn. A good way to do this is to search through the program for "PenUp" or "PenDown" text. Searching for "PenUp" shows that there are a few penup commands in the program, but only one "PenUp word; it has the matching uppercase "P" and "U" characters in it. It is in the lowerPen procedure, which is simple to read. It invokes the procedure drawButtonAt. You could now search for this procedure and read it. You could also search for where lowerPen is invoked. You would find that the only place is in flipPenState. Searching for this procedure and you find out that it is only invoked in mouseClicked. So, you now know the flow of the program:
|
Notice that this matches the flow shown in Figure 14.1. So either way, you arrive at the same point. You need to read through at least the procedures mouseClicked through drawButtonAt.
The turtle will need to move down to the lower left area of the graphics canvas to draw a new button and that's exactly what we see in the code. But, I do not see any instructions to get the turtle back to where it was when the mouse was clicked!
So, our prediction is that the turtle is being moved down to draw the button and not being moved back. To test this, you can add some debug code. What you need is a way to print out where the turtle is. You learned about the pos operator back in the "Words and Sentences" lesson which does the job. It is an operator that outputs the coordinates for the current position of the turtle. Let's use the pos operator and print where the turtle is at the beginning of lowerPen procedure and where it is at the end of the procedure. Modify lowerPen to look like this:
|
Then invoke main in the CommandCenter to restart the program. Click the mouse on the PenDown button. two lines of numbers are printed in the CommandCenter, the position of the turtle when lowerPen started and where it ended up at. The lines of number sentences don't match! Our test step has proved our prediction and so our hypothesis is probably correct.
If you want to prove to yourself that the turtle has been left in the button you can check to see where the turtle was when it drew the button's label. Modify the drawButtonAt procedure. Add the debug instruction
|
before or after the label instruction at the end of the body. Now run the program again by invoking main in the CommandCenter. Click on the PenDown button. Figure 14.2 shows what happened when I did this.
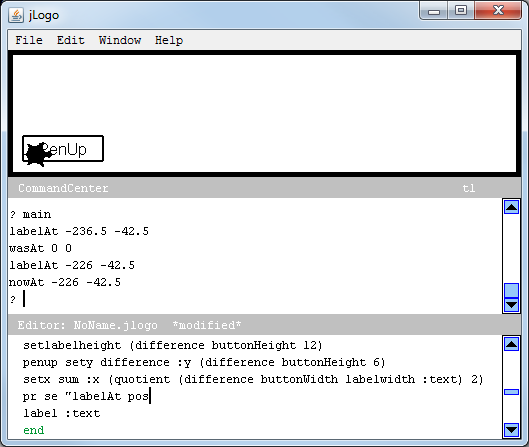 |
Check it out... at the end of lowerPen, the turtle is at the same location where the PenUp label was drawn. That's a problem.
So, to fix the bug we need some way to remember the position of the turtle before moving it to change the button and then move it back to the remembered position afterwards. To do this I need to introduce a few commands I haven't told you about yet: local, make and localmake.
The LOCAL Command
The local command declares a new variable. Like an input variable, it can only be referenced in the body of the procedure it is part of.
The syntax of the local command is:
| local | <name> |
- the command name: local and
- a <name> (a word, the variable's identifier)
Examples of local instructions are:
|
Notice that the input identifiers are words in these examples instead of having dots as their prefix (:identifier or :savePos).
You are probably thinking... "Why is there a quotation mark prefixing the variable's name instead of a colon (dots)?" Input variable identifiers on a procedure title line are always prefixed with dots, e.g.,
|
Well, this title line could also be written
|
although you rarely see it entered like this. A procedure title line is special. It does not follow the rules that the rest of Logo's commands go by. But, since you will probably never see a Logo procedure title line with quoted names, I'll stick to dots-prefixed identifiers in all of my examples.
The MAKE Command
The make command puts a value into a variable.
The syntax of the make command is:
| make | <name> | <value> |
- the command name: make
- a <name> (a word, the variable's identifier, and
- a <value>
Procedure inputs get there values from the procedure invocations. Take the simple example:
|
Here the input named size is specified in the procedure definition. The two invocations that follow the definition specify different values for the input. When the first invocation is performed, size has the value 50, on the second invocation it has the value 100 in it.
Following a local command, the variable created is empty. Figure 14.3 shows what happens when you use local to declare a variable named emptyLocalVar and then attempts to print its contents.
| |
Until you put something into a variable, it has a special value null which means nothing is in it. So, the make command is needed to put a value into a variable. In the case of our problem with the Draw program, we need to save the position of the turtle. The following example use of local and make will do what we want.
|
The LOCALMAKE Command
The localmake command combines local and make into a single command. It's just an abbreviation that saves you from having to specify the variable's name twice.
The syntax of the localmake command is:
| localmake | <name> | <value> |
- the command name: localmake
- a <name> (a word, the variable's identifier, and
- a <value>
Example Use: Fixing Our Draw Program
Now let's use these commands to fix the bug in our Draw program. We'll first use localmake to declare a local variable and save the turtle's current position in it. The appropriate place for it is at the start of lowerPen. The command will replace the first debug instruction.
Then we will use the setpos command to move the turtle back after drawButtonAt has completed? If you've forgotten about setpos, I introduced it back in the Words and Sentences lesson. After the drawButtonAt instruction, we will lift the pen and use setpos to move the turtle back to the saved position. So, our modified lowerPen now is:
|
Make the changes in the Editor and try it out. It works... Well, almost... The first time you click on the PenUp button, the turtle stays on it!!! Ahhhh!!!!
Well, to make a long story short, if you read more of the program you will see that you need to make the same changes to the procedure that is the counterpart to lowerPen. Its name is liftPen.
OR... what we can do is move saving and restoring the turtle's position into the drawButtonAt procedure. This may be the best way to solve our bug. Why? Because you will probably want to extend your Draw program, add more functionality, which means more buttons. How about a button to start over, and one to change the color of the turtle's pen? How about a button to change the size of the turtle's pen? How about a Fill button?
So, why add the same code to all of these procedures? Instead, why not solve it once, in one place, in drawButtonAt. Do it...
And then extend your program as you get time.
Project: String Art
I was introduced to String Art as a child, a long time before we had computers. We would paint a thin piece of plywood white, draw a polygon on it, mark off equal intervals on the sides of the polygon, hammer in little nails at the marks, and then connect the little nails with colored string. It was called art and crafts.
Use Google Image Search to search for "string art" and checkout what I'm talking about.
But now that we have computers and Logo, we can draw some StringArt. In the process, you might learn something about geometric design. If you are already a math wizard, you could use your understanding of trigonometry to write a StringArt program. But, don't worry if you haven't been introduced to trig yet! I'm going to show you how to use local variables, to produce StringArt. All you need is the depth of expertice in mathematics that you've used to get this far.
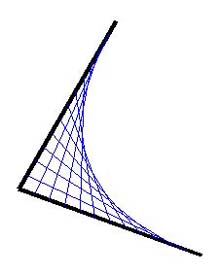
Let's first draw something like Figure 14.4a Then, your only limitation will be your own imagination.
In the following paragraphs I use common naming/terms from a junior high school math textbook (Gateways to Algebra and Geometry), e.g., angle, ray, vertex, etc... If you need background in this area, there is a ton of material out on the web, just Google for "Introduction to angles" and you will find web pages, even videos to help you out.
 |
 |
| |
|
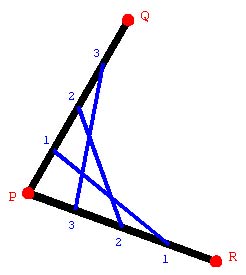
The basic technique in StringArt is to identify corresponding points on the sides of angles in some geometric object and then connect them with colored string. On the sides of angle QPR in Figure 14.4b, three points are marked. On one ray, line segment PQ, the numbers start at 1 for the closest point to the vertex and increase as you move away from it. On the other ray, line segment PR, the numbering is reversed. When identically numbered points are connected by straight lines, a hyperbolic curve is formed. These curves are pleasing to the eye and structurally sound; Google "Felix Candela" to see how he used hyperbolic curves in his beautiful architectural works in Mexico.
Our exercise is to write a procedure which is given
- the X and Y coordinates of point P, the vertex of an angle,
- the heading and length of line segment PQ of ray 1,
- the heading and length of line segment PR of ray 2, and
- the number of strings to draw.
Figure 14.4a was drawn with its vertex, point P, at -100,-50. A line segment (PA) of ray 1 has a heading of 30 degrees in TurtleSpace and is 200 turtlesteps long. A line segment (PC) of ray 2 has a heading of 110 degrees and is 200 turtlesteps long. It has 11 strings.
I promised above that you would not need to know trigonometry. Here's how we'll get around this: we'll get the turtle to walk along the path of Ray-1 to a point. The current position of the turtle, its X and Y coordinates, can be obtained using the pos operator. We will remember them in a local variable. Then we'll return to the starting point and walk along Ray-2 until we get to the corresponding point on it. Once there, we instruct the turtle to lower its pen and go to the remembered point with the setpos command.
Here's a start; it's incomplete but should give you a feel for the structure of the solution:
|
You've learned everything you need to extend this to arrive at a working program. Go off and give it a try... At least play around a bit.
Did you get it working? If so, great job! Skip ahead to More Realistic Trees. If not, don't fret, you'll get it; let me give you some tips.
HELP!
My RULE #1 is: "get something working, then improve it."
So, let's get a single line drawn.
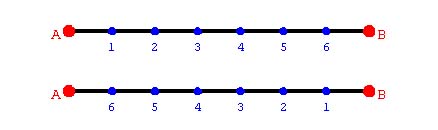
Write two procedures: walkToPointFromA and walkToPointFromB where AB is a line segment. The procedures have the inputs: :pointNum, :abLen, and :numPts.
|
The difference between these two procedures is the ordering of the points, see Figure 14.5. The top line segment has points numbered as walkToPointFromA addresses them; the bottom line segment shows walkToPointFromB's ordering of points.
 |
With these completed, you can plug invocations of them into drawString, i.e.,
|
Off you go; fill in the code for the walkToPointFrom... procedures.
More HELP Please
A good next step is for you to fill in the missing code that saves the turtle's position and then goes to this position once you've moved to the corresponding point. You've been introduced to the localmake, pos, and setpos commands. For remember point, we can use localmake to put the turtle's position into a local variable. This variable will then be accessed when we instruct the turtle to go to the remembered point.
You could also use the setxy command together with a couple of other operators which you haven't used yet (xcor and ycor) instead of pos and setpos. In this case you would declare two local variables, one to hold the X coordinate and the other to hold the Y coordinate. It's up to you - either way works.
|
If you have everything right, your program should now draw the angle with the first string. If not, it's debug time. Use trace to see if your procedures are getting inputs that match what you think they should. Add println instructions to see what is happening when your program is being executed. Treat debugging a program as a puzzle, a game - so solve it!
Keep at it till you have a working program. You can do it. Remember that you learn a lot when you make mistakes. If you are not struggling a bit, you must not be learning anything new.
The State of the Turtle
So, up to this point, all we have thought about is saving the turtle's position, moving turtle around a bit, then sending it back to the saved location. But the position of the turtle in not the only thing that can be changed. We change the state of the turtle's pen (whether it's up or down), the size of the pen, the color of the pen, the turtle's heading, the color under the turtle, etc...
All of these things combined represent the state of the turtle. Just as you have found the need to save and restore the turtle's position, you will write other procedures in the future that save other elements of the turtle's state. You may find the need to temporarily change the color of its pen; in this case you might need to save and restore its original color. Table 14.1 contains all of the operators that output the values of the different elements that make up the current state of the turtle.
| Command | Description |
| COLORUNDER | The color under the turtle, at the tip of the pen, is output. |
| HEADING | Outputs the turtle's heading in degrees. |
| PENCOLOR | Outputs the color number of the turtle's pen. |
| PENDOWN? | Outputs true if the turtle's pen is in the down position, otherwise false. |
| PENSIZE | Outputs the size of the turtle's pen, its width in turtleSteps. |
| POS | Outputs the current coordinates of the turtle as a sentence. The X coordinate is the FIRST of the sentence; the Y coordinate is the LAST of the sentence. |
| XCOR | Outputs the turtle's X-coordinate. |
| YCOR | Outputs the turtle's Y-coordinate. |
| |
|
Try them out. Prove to yourself you understand what's going on.
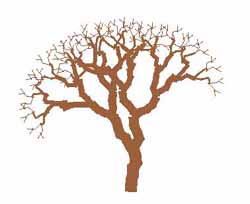
Project: More Realistic Looking Trees
 |
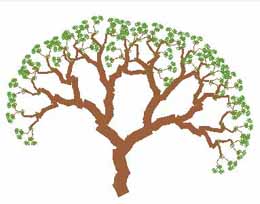 |
So, we had fun taking advantage of the power of recursion in the last lesson drawing trees. With just eight instructions, we could draw trees that could have any number of branches we wished. But, they were so, well... computer generated. The turtle is is a digital turtle, not alive, composed of atoms, and so it draws very straight lines. Let's teach it to not be so perfect.
First, let's write a procedure that draws a rough line, a sketched line. and then we can use it instead of forward and backward.
Let's write a procedure named sketchLine that moves the turtle forward some amount of turtle steps. When it's done it will end up at the same spot that a forward command would, given the same number of turtle steps as its input. But, the turtle will wander around a bit on its way to the spot.
|
If you think you know how to do this, go ahead and write sketchLine on your own. Just be prepared... This program will surely surprise you a bit; I had to experiment quite a bit to get aesthetically pleasing (at least reasonable) lines drawn. And, my final version can certainly be improved upon!
If you don't know how to start, let me help out a bit.
Ok, my first attempt at sketchLine was very simple, but gave me a starting point. I had a couple of symbolic constants I could tweak, experiment with.
|
You'll need to dig up your copy of randomInRange. We wrote it in Project: Random In Range, back in the Defining Operators lesson.
Once you have the program assembled, test it. A nice way to do this is to repeatedly invoke main with waits in between. You should be able to do this with the following instruction typed into the CommandCenter.
|
Figure 14.7 shows a few lines I captured that this program drew. Once in a while a nice line like the first one shown (A) is drawn, but most of the time the lines drawn had horrible tops - the last segment.
 |
 |
 |
| |
|
|
The reason for these ugly last segments is that we promised that sketchLine would end up at the same point that forward would go to. There are many ways to solve this, but while I have the chance, I'm going to introduce the towards Logo operator. I used it to keep the wandering turtle a bit more on the right track. Here are my *improved* drawSegment and sketchLine procedures.
|
This fixes the problem with the last segment. But, it now makes too smooth a line for me. But, since I have the deviation symbolic constant, all I need to do is make this a bit larger, say change it from 10 to 30. This is the reason I had deviation in the first version of the program - to make it easy to change.
I'll leave all the rest of the programming for this project up to you. There are a few more things I spent time refining, things that showed up when I combined sketchLine with the Tree program we wrote in the previous lesson. See how much more natural looking you can get your trees.
Summary
In this lesson, you learned more about variables. You learned how to add additional local variables to the procedures you write. You also learned how to put values into these variables.
You also learned that you have access to the state of the turtle, through a bunch of operators. The operators output the various values of the elements making up the state, like the turtle's heading, its pen's color and size, etc...
Hopefully, by working through the projects, you are learning how to break the programs you are writing down into pieces that you understand. You are learning structured thought which will serve you well in all that you do, for the rest of your life.
Go to the Table of Contents
On to Global Variables
