Background
Logo Programming
- Commanding a Turtle
- Pseudocode
- Adding New Commands
- Iteration & Animation
- Hierarchical Structure
- Procedure Inputs
- Operators & Expressions
- Defining Operators
- Words & Sentences
- User Interface Events
- What If? (Predicates)
- Recursion
- Local Variables
- Global Variables
- Word/Sentence Iteration
- Mastermind Project
- Turtles As Actors
- Arrays
- File Input/Output
- AI: Pitcher Problem Solver
Java
- A Java Program
- What's a Class?
- Extending Existing Classes
- Types
- Turtle Graphics
- Control Flow
- User Interface Events
Appendices
- Jargon
- What Is TG?
- TG Directives
- jLogo Primitives
- TG Editor
- Java Tables
- Example Programs
- Installation Notes
Updates
- December 13, 2008
- March 7, 2009
- January 6, 2012
- March 15, 2013
- January 20, 2014
- February 13, 2014
- July 29, 2014
- January 18, 2016
- January 29, 2016
Lastly
Adding New Commands
Introduction
        One of the things we should demand from a powerful programming
        language is the ability to build abstractions by assigning names
        to common patterns and then to work in terms of the abstractions
        directly. Procedures provide this ability. This is why all but
        the most primitive programming languages include mechanisms for
        defining procedures.

              Structure and Interpretation of Computer Programs (p. 56)
               Harold Abelson and Gerald Jay Sussman with Julie Sussman
In this lesson you will learn how to teach TG's Logo interpreter new commands. When TG starts up, its interpreter only understands the names of the procedures that are built into it (known as its primitive procedures). In this lesson, you will learn how to add names to the interpreter's vocabulary; you will teach it how to do something it does not know how to do.
        procedure n 1 a: a particular way of accomplishing something or
        of acting 2: a series of steps followed in a regular definite
        order.
                                   Webster's New Collegiate Dictionary
This capability of naming a procedure (a list of instructions) for doing something is very powerful and fundamental to programming a computer. As such, I think that this is the most important lesson in this series. How important is the concept of a procedure? Well... one of the earliest computers, the Harvard Mark I computer, deployed in 1944, used them. It had addition, subtraction, multiplication, and division as primitive operarations, but provided logarithmic and trigonmetric functions as subroutines (another name commonly used for procedures).
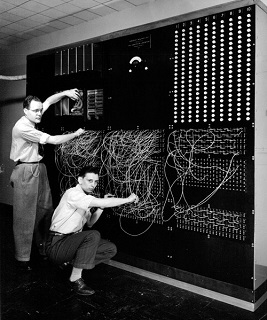
|
Computer honchos work on a section of
The whole apparatus measured 55 feet long. Courtesy Computer History Museum |
The new named procedures you write will be made up of instructions that the interpreter already knows how to perform, procedure names existing in its vocabulary. Writing your own (a.k.a. user-defined) procedures will be a BIG help as you construct larger programs. They will help you write programs that actually do what you want them to do.
Starting with this lesson, I want you to think of writing computer programs as a process of extending the Logo programming language, creating your own language that you then use to instruct the computer to do what you want.
Procedural Abstraction
In the last lesson, I stressed the importance of breaking up your programs into pieces. Each piece was written as a pseudocode comment which made it easier to understand. The programs you wrote were the concatenation of the pieces.
This approach is very important for writing programs that are easy to read and understand. A fair question to ask is why is it so important to write a computer program that is easy to read and understand?.
One reason is that it is a good practice to write programs in stages; get something working and then enhance it until you complete the program. Another reason is that professional programmers rarely write complete programs from scratch; they modify existing programs. This means that they must read and understand the programs before they modify them. Programs that you write should be structured so that they can be understood by others and even yourself months after you think you are done with them.
For review, here are our first three steps for writing computer programs:
- think about what you have to do and approaches to it,
- divide up the program into pieces described by pseudocode, and
- convert the pseudocode into instructions - Logo source code.
The pseudocode we've written is simply our thoughts about breaking down a problem into *understood* pieces. We made it part of our programs by including it as comments. It is now time to make use of Logo's capability for extension - its support for user-defined procedures - to enhance the labeling of lists of instructions. Done right, this will get us programs which are easier to read and understand.
Writing our own Logo procedures gets us procedural abstraction, an important separation of the description of what something does from how it does it. For now, don't worry about this technical term. For now, just think of it as jargon for inventing new commands that do something, something that is the first thing you think of when you hear the name you give it. The names we give our new procedures need to be carefully chosen abbreviations for what they do. The choice you make for the name of your new procedure is very important.
Procedural abstraction is the most important concept you will learn in these lessons.
So, how do we teach our Logo interpreter new procedures? Let's work through an example. This will give you a good feel for what this lesson is all about.
Our new challenge - we are going to write a program that draws a word.
Practice: Draw a Word
Write a program that draws a three to five letter word, a name of some sort... I picked the name of our programming language: LOGO.
Since this and future programs we will write are getting large, it is a good idea to install the TG programming environment on your computer instead of using the copy on this web page. Appendix H (Installation of TG) covers how to get it and run it.
If you can't install TG on the computer you are using, here is the TG applet. Just click the mouse in the Editor to activate it.
TG Programming Environment Applet
Click the mouse in the Editor and type in your pseudocode, then instructions that draw your word. Follow the process that was covered in the previous lesson.
Figure 4.1 shows what I came up with. I drew the word "LOGO" in uppercase characters.
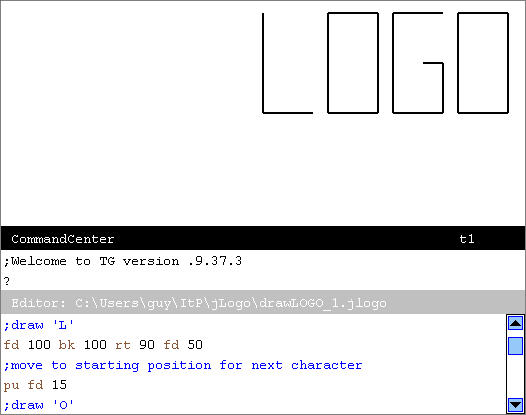 Figure 4.1
Introducing "TO"
Table 4.1 shows the pseudocode descriptions of what I did to draw the word "LOGO" and their comparable lists of Logo instructions.
| Pseudocode | Logo Instructions |
|---|---|
| ;draw 'L' | fd 100 bk 100 rt 90 fd 50 |
| ;move to starting position ;for the next character |
pu fd 15 |
| ;draw 'O' | pd fd 50 lt 90 fd 100 lt 90 fd 50 lt 90 fd 100 |
| ;move to starting position ;for the next character |
pu lt 90 fd 65 |
| ;draw 'G' |
pd lt 90 fd 100 rt 90 fd 50 bk 50 lt 90 bk 100 rt 90 fd 50 lt 90 fd 50 lt 90 fd 20 |
| ;move to starting position ;for the next character |
pu bk 20 rt 90 bk 50 rt 90 fd 15 |
| ;draw 'O' | pd fd 50 lt 90 fd 100 lt 90 fd 50 lt 90 fd 100 |
| |
|
Here are a few problems I have with this program, these lists of instructions.
- the pseudocode is only a comment and its relation to the instructions it pertains to is purely positional. There is no guarantee it matches what the instructions do. If the Logo instructions are edited/changed so they no longer match the pseudocode/comment, we have a BIG problem. Erroneous comments are worse than none at all. Once someone reading a program finds a comment that does not match the source code associated with it, she assumes she can no longer trust any comments in the program.
- if the instructions are moved around and/or combined with others it will be hard to figure out if this new combination of instructions and associated pseudocode comments still match,
- in this program, each letter is drawn separately (O is drawn twice, with two identical lists of instructions). This means a larger program - more to type or copy/pasting. Think about how big your program would be if you drew MISSISSIPPI even though it is made up of only four unique characters.
Definition of a Procedure
There is a another way to attach meaning to a list of instructions - give the list a name, an identifier. You can teach our Logo interpreter TO do something. With a Logo interpreter, you can define a new procedure for doing something, teach it the name of a new command.
Here's how to define a new command that draws the letter O.
|
Here is another definition that accomplishes the same thing.
|
I prefer the first definition. It is easier to read, very symmetric. You can see (actually better predict) what our Logo interpreter will do when it performs your new procedure. The better you can predict what will happen, the more confidence you'll have that your new procedure will do what you want it to do - that your definition is correct.
So, what have we done here?
We've used special things, directives ("TO" and "END"), to teach our Logo interpreter a new command. Just like it already understood "forward" and "left" commands, TG's Logo interpreter now knows the command name "drawO" and what it consists of - a list of instructions. Since you defined it, it's called a user-defined procedure. The procedures that Logo understands upon starting up are called built-in procedures.
"TO" in Detail
The general form, the syntax, of a procedure definition is:
| to | <name> |
| <Logo-Instructions> | |
| ... | |
| end |
Figure 4.2
Procedure definitions consist of:
- a title line - the "TO" line containing the new procedure's name, its identifier,
- a body consisting of one or more lines of instructions, and
- an end line - a line consisting of only the word "END"
Practice: Define a New Procedure Yourself
Either use the TG programming environment on your computer or go back up to the TG applet or use a small popup TG applet to type in the definition of drawO. You can type the definition into either TG's CommandCenter or Editor. If you want to see how defining procedures in the CommandCenter works, click here for a detailed walk through defining a new command.
The CommandCenter is ok for adding a trivial procedure when you just want to experiment. But, most of the time you will want to use TG's Editor. It gives you the ability to change stuff quickly and easily - which is why it's called the Editor.
If the TG programming environment you're going to use does not have an Editor window, open it with the EDITOR directive in the CommandCenter or using the menu system.
Figure 4.3 is a snapshot of TG after the title line of has been entered into the Editor. In this case, the Editor has added an end line for us automatically, opened a blank line between the title line and the end line, and the cursor is indented ready for us to start typing in the body of our new procedure. To make it easier for us to read, the title line and the end line are colored green.
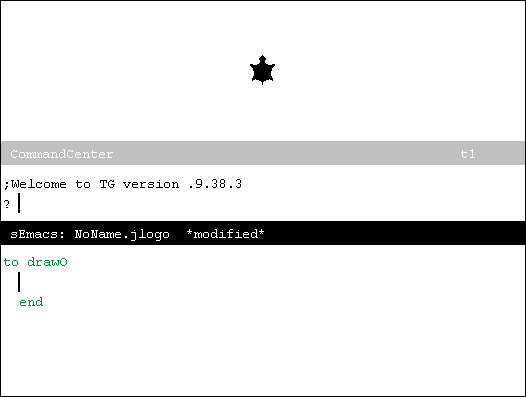 Figure 4.3
As we type in each line of instructions that make up the body of our new procedure and press the [Enter] key, the Editor will open a new blank line and properly indent for us.
Once we've completed the definition of our new procedure we can use it like any of the other Logo commands we've been using. We've just taught TG's Logo interpreter how to do something; We've added a new command to Logo's vocabulary. Now it is time to test it, to see if it does what we expect.
Go back to TG's CommandCenter and type "drawO" and press [Enter]. In programming talk, this is called invoking the procedure - we are telling the interpreter to perform the instructions that make up the body of the procedure.
As a side note, historically, procedures have also been referred to as subroutines with the term call meaning to perform them. In these lessons, the phrase "invoking a procedure" means the same thing as "calling a subroutine" if you are familiar with this terminology.
Back to our new procedure... Did your drawO do what you expected?
Problem Solving: Errors in Procedure Definitions
If yes, great! If no, there are multiple kinds of mistakes you must deal with when you are writing computer programs; one kind is called syntax errors. I briefly described them in the Commanding a Turtle lesson. Syntax errors occur when you type something in that the Logo interpreter does not understand. Figure 4.4 shows an example body for drawO that I typed in. I made a couple of mistakes on purpose to demonstrate a couple of things.
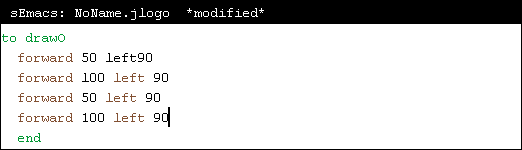 Figure 4.4
The first mistake I made was to leave out the space between left and 90 on the first line in the body. Notice that the Editor helps you see that you've made a mistake. Logo primitive command names are colored brown when entered in the Editor. Since "left90" is not a primitive Logo command, it is displayed in black.
But also notice that there is no error message. Not YET...
When I invoked my drawO procedure the error was detected and reported. Figure 4.5 shows the pop-up error message.
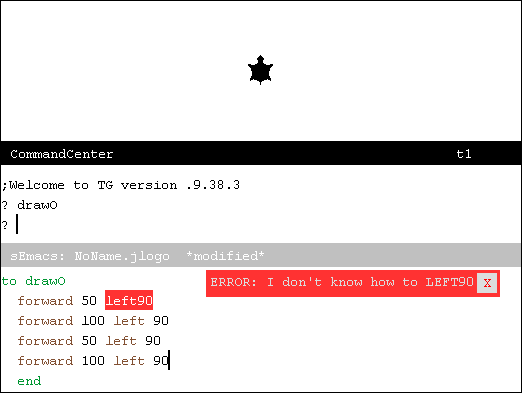 Figure 4.5
Why the delay? When a procedure is defined, all that happens is the collection of the text that makes up the procedure's body. The Logo interpreter does not look at, or process, the text. It just saves the text, linking it to the procedure's identifier. Then, when the procedure is invoked, the Logo interpreter gets involved, converting the text into instructions and then performing them.
Think about it; this is similar to the way a contacts list works on a mobile phone. When you enter a name and phone number into Contacts, it does not do anything but save the information. You have to select a contact and get the phone to dial the number before you know for sure whether the number was entered correctly.
Back to my drawO procedure; there's a second syntax error. Figure 4.6 shows what happened when I fixed the left90 mistake and invoked drawO again. I had pressed the lower-case alphabetic character 'l' instead of the number one key for the input to the first forward command. In this case there is no text coloring to help.
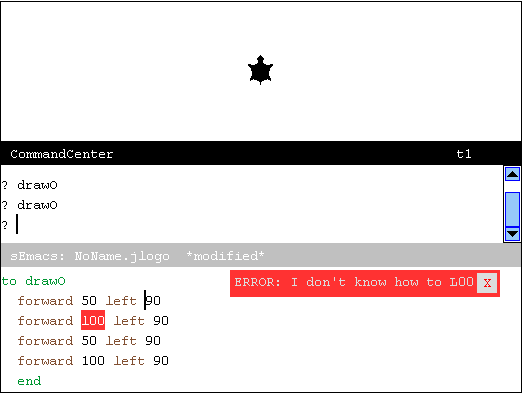 Figure 4.6
In this example, when the Logo interpreter performed the forward command, it read the next word expecting to get a number. Instead it got a word starting with the letter 'l' which looks similar to the number one. In this situation, the Logo interpreter looks to see if there is a procedure with this word ("l00") as its name. Since it's actually a mistake, it does not find one. It complains that it does not know how to do anything named "L00".
In addition to syntax errors, there is another kind of mistake you can make when writing computer programs. And, chances are good that you've already experienced this second type.
It's time to talk about logic errors. Even if you typed the drawO procedure in exactly as it was presented, you probably did not get a properly drawn O when you tested it. Chances are, your O was laying down on its side. Why? Please think about it for a bit before reading on...
The root of this problem is that when I wrote the pseudocode and instruction list program, the O always followed another letter. So the code that moved the turtle from where the previous letter ended to the lower-left corner of the O left the turtle heading right, headed east. This is a logic error because our new procedure made an assumption that was not always true.
The proper way to fix this logic error is to add an instruction at the beginning of the body of drawO which sets the turtle's heading to be east, ninety degrees in TurtleSpace. Here's the description of the command you now need.
| Command | Input | Description |
| SETHEADING | number |
Turns the turtle to a new absolute heading. The input,
a number, is the heading in degrees clockwise from the
positive Y axis, i.e.,
0 is North (up), 90 is East (right), 180 is South (down), and 270 is West (left). |
| |
||
And now, with setheading, we have a drawO procedure that does what we want. Or do we?
Nope... there is a second logic error that I have made in this procedure definition. We have not seen it yet. But what if the turtle's pen is not in the down position when drawO is performed? This is very likely to happen when the turtle is moved to the place where the 'O' is to be drawn. The pen will be up!
So finally, with setheading and pendown, here's the new definition of
drawO.
|
Now we have a procedure that will always draw a proper O. What we've done is to generalize the procedure. It now will work in more places in programs we write. This is an important trait of a well-written procedure. In fact it is so important that I'll talk about it in a coming section of this lesson. But before that...
Practice:
Define Procedures for Other Letters
Now it's your turn; define new procedures for all of the letters in the word that you chose to draw back at the beginning of this lesson. Use the TG application if you have it on your computer, otherwise either go back up to the TG applet or use this small popup TG applet. Use the Editor to define your procedures so that you can change them. If you are using the TG application, you can save your program as a file on your computer.
As you define them, test them by invoking the new commands in the CommandCenter. Make sure they do what you want.
Here are my definitions of drawL and drawG:
|
Take a few minutes to read my definitions closely. Notice that the bodies of these procedures do not match the instruction lists in Table 4.1.
What is the big difference?
Hint: the answer I'm looking for has to do with the logic, not the syntax (yes, the primitive command names are abbreviated in Table 4.1 and not in the command definitions). But that's not the answer I'm looking for.
Why do you think I've made the changes?
Hint: I'm thinking ahead to when I'm going to put drawL, drawO, and drawG together, along with the need to move the turtle to where each letter needs to be drawn.
Symmetry, Generalization, and Black Boxes
As I hinted, the changes I made in the new definition of drawL and drawG were made in anticipation of putting all the letters together to form the word LOGO. What would all the code look like if I had not made any changes?
Here is what I would have:
|
There are two things I do not like about this program.
- In this program, I have the same comment in three places, but the instruction lists associated with the identical comments are all different. This hints at the real issue...
- The instructions that move the turtle from where the L ended to where the O begins depend upon knowing where the drawL command left it. Similarly, the instructions that move the turtle from where drawO left the turtle to where drawG starts has a similar problem. And, there's the same problem going from the G to the final O.
Symmetry
Acting as an experienced programmer, all of the procedures above (drawL, drawO, and drawG) follow a specification I came up with:
    Draw the letter {'L', 'O', 'G'} positioned such that its
    lower-left corner is where the turtle currently is at, and
    return the turtle to the starting location after drawing
    the letter.
I can and should document this with comments in my program. Since all of my new procedures that draw letters work the same way - they are symmetric - a couple of comment lines before all of the definitions will suffice.
    ;the following procedures (drawG, drawL, and drawO) draw a
    ;letter (the last character of their names).  The letters
    ;are centered in a box that is 100 turtle steps tall and
    ;50 turtle steps wide.  The lower-left corner of the box
    ;is the turtle current position. The turtle is returned
    ;to this position after the letter is drawn.
This becomes the contract for using the drawL, drawO, and drawG procedures. I can now use these procedures as black boxes.
Contracts And Black Boxes
Here's the way to fix these issues, in the language of computer programmers:
"All of our procedure definitions must be written to specifications provided as a contract. They are then to be treated as black boxes."
Let me explain what this means.
    Black box is technical jargon for a device or system
    or object when it is viewed primarily in terms of its
    input and output characteristics.  Almost anything might
    occasionally be referred to as a black box: a transistor,
    an algorithm, humans, the Internet.  ( WikipediA )
And, since all of the procedures that draw a letter support the same contract, I can now write a new procedure that moves the turtle right one letter position, including a gap between letters.
|
The program to draw the word "LOGO" becomes a list of the new commands which I can put into a procedure definition with a self-descriptive name.
|
Finally, a common practice is to define a procedure named main as the starting point for your program. So, here's the main procedure for my DrawLOGO program. Its first line is basic initialization that hides the turtle, returns it to the center of the graphics canvas, clears the graphics canvas, insures the turtle is facing north, and sets the pen's width to a single turtle step. After this initialization, the word LOGO is drawn in the graphics canvas.
|
Figure 4.7 shows the structure of how all of the new procedures I've written fit together. The diagram is what is called a static call graph.
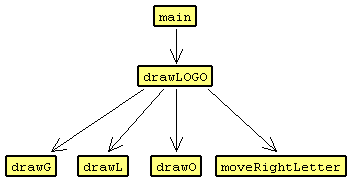 Figure 4.7
In summary, we've changed the process of writing computer programs. For our initial small programs we first wrote pseudocode and then converted it into Logo instructions. But as we prepare to write larger programs, we added another step - extending the Logo programming language by giving lists of instructions names. We taught the Logo interpreter new procedures with names. We then used these named procedures to write our program.
The way we did this, the way we defined procedures, was to take the instructions associated with a pseudocode comment and package them together, giving them a name which described what the instructions did. The names were abbreviations of the pseudocode comments.
Each of the procedures we wrote was simple to write by itself. This is very important - necessary to get large programs correct. The full program, composed of these new procedures, was then also simple. This makes the program easy to read and understand.
Click here to see the full text of my DrawLOGO program
Practice:
Complete Your Own Word Program
Using my example as a model, write your own DrawXXXX program (where you replace the XXXX with your word. You should define a new procedure for each unique letter in your word. Include a moveRightLetter procedure definition. Your program should end up looking similar to mine - a set of defined procedures.
A Bit of Tech Jargon
If you wrote procedures for every character in an alphabet, in the case of these lessons the English alphabet, you will have defined your own font. Google the word "font" and visit some of the websites it recommends to see what a font is, and the variety of fonts that exist.
Tracing the Steps Of Your Program
What about watching what the Logo interpreter does when it performs your program?
In the previous lesson you learned how to use the THROTTLE command to slow down the turtle as it draws stuff. There is also a way to watch the Logo interpreter perform procedures that we define. Let me walk you through how to get a structured view of what the interpreter does.
Figure 4.8 shows the TG applet after I
- used the File -> Open pop-up menu to load my DrawLOGO.jlogo program into the Editor,
- entered "trace all" into the CommandCenter (to request that the interpreter display tracing information for all procedures in my program), and
- entered "trace" into the CommandCenter (to get a list of procedures that the interpreter is going to trace).
I'm ready to tell the interpreter to perform my program and in the process display entering/exiting messages.
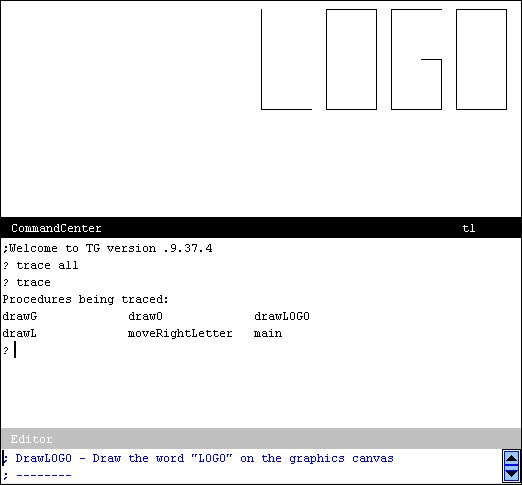 Figure 4.8
Figure 4.9 shows the TG applet after I entered "main" into the CommandCenter telling it to perform the procedure I taught it named "main".
What was displayed when I pressed [Enter] was the chronological record of when each of the procedures I wrote was performed, when the intepreter entered the procedure (started performing the instructions in it) and when the interpreter exited the procedure (had completed all of its instructions).
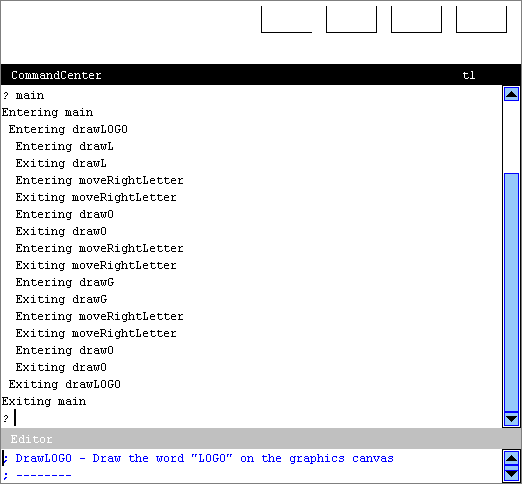 Figure 4.9
In addition to the entering and exiting messages, there is additional structure displayed. Do you see it? The indentation shows the hierarchical structure of the program.
To watch what's happening, what the Logo interpreter is doing, with more detail, enter a throttle 3000 command before entering/invoking main. Figure 4.10 shows the the Logo interpreter performing the program in slow motion, after just starting to execute the moveRightLetter procedure. Watch it for yourself. Either use the TG programming environment on your computer or go back up to the TG applet.
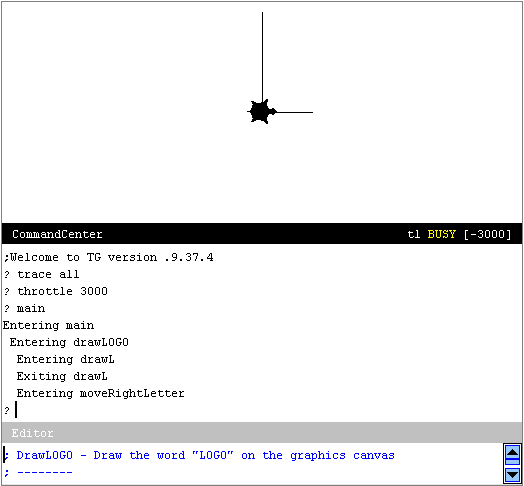 Figure 4.10
By the way... the answer to the above question about additional structure that trace provides... it is the indentation of the lines of output. If you did not notice this, look again!
Logo Animation - Procedures in Action
Your ability to write computer programs that do what you want is directly tied to your understanding of what the Logo interpreter does when you give it some program to perform. What the Logo interpreter does must not be thought of as magic; you need to be able to predict what it will do when you give it some instructions.
In the past couple of lessons, your understanding of what the Logo interpreter will do was very simple - it performed instructions you gave it...
- one after another,
- left-to-right on each line,
- from the first line down through the last line.
Starting with this lesson, this explanation is no longer accurate. The Logo interpreter does read the programs you give it left-to-right and top-to-bottom, but it does not necessarily perform all of the instructions as they are read. When it reads a line of text starting with the word "to" it then reads the name you provide (which follows the word "to"), remembers it, and continues to read and remember all of the instructions which follow, up to a line containing only the word "end". It does not perform the collected instructions. They will be performed when you tell the Logo interpreter to do so by [Enter]ing the name of the procedure as an instruction, say into the CommandCenter.
 Figure 4.11
Reflection
Write a description, or a set of rules that describe, the amount of indentation a trace output line has.
Practice: Rewrite DrawHouse
At the end of the previous lesson you were asked to write a program that drew a simple house. Figure 4.12 shows the house you were to draw. You did this by first writing out the process as pseudocode and then translated this to Logo. Rewrite your drawHouse program using our new approach of defining commands for parts of the house. Write new commands named:
- drawFront,
- drawRoof,
- drawDoor, and
- drawWindow.
Use them in your program, substituting them for the primitive commands that did the drawing they now do.
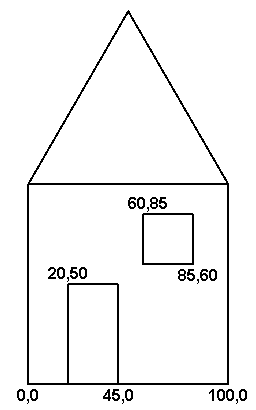 Figure 4.12
Investigation
If you didn't click on the "subroutines" link above. Bring up Wikipedia in a browser and search for the words "procedure call" and read about the history of procedures, their creation and calling (invoking) them.
Go to the Table of Contents
On to Iteration
