Background
jLogo Programming
- Commanding a Turtle
- Pseudocode
- Adding New Commands
- Iteration & Animation
- Hierarchical Structure
- Procedure Inputs
- Operators & Expressions
- Defining Operators
- Words & Sentences
- User Interface Events
- What If? (Predicates)
- Recursion
- Local Variables
- Global Variables
- Word/Sentence Iteration
- Mastermind Project
- Turtles As Actors
- Arrays
- File Input/Output
- AI: Pitcher Problem Solver
Java
- A Java Program
- What's a Class?
- Extending Existing Classes
- Types
- Turtle Graphics
- Control Flow
- User Interface Events
Appendices
- Jargon
- What Is TG?
- TG Directives
- jLogo Primitives
- TG Editor
- Java Tables
- Example Programs
- Installation Notes
Updates
- December 13, 2008
- January 6, 2012
- March 15, 2013
- January 20, 2014
- February 13, 2014
- July 29, 2014
- January 18, 2016
- January 29, 2016
Lastly
Defining Operators
Introduction
In the previous lesson you learned about operators - procedures that produce an output. Most of the operators you used needed an input or inputs and used it/them in some way to produce the output.
In this lesson, you will learn
- how to output a value from a procedure that you write; you can write your own operators, another mechanism for creating more powerful procedural abstractions, and
- about symbolic constants (names for values that never change) and how a procedure that outputs a value can serve this purpose.
Symbolic Constants
As I described in the very first lesson, a computer only works with binary numbers, called bits. But I went on to show how things that you want to work with (e.g., characters, decimal numbers) are built out of these bits. Systems programmers (wizards that write very low-level programs like assemblers, interpreters, compilers, system libraries, etc...) have been providing these niceties for almost ever. This allows you to write programs that you can read, that make sense to you.
The programs you are now writing are starting to get big and they are taking hours to write. In a few lessons, you will be writing programs that take many hours to complete. This means that the programming will be spread over days. Each time you return to continue programming, you need to pick back up where you left off. The point is that your programs need to be easy for you to read so that you can refresh your mind on what's done and what's left to do. I suggest that you get into the habit of giving names to many of the numbers that are starting to become ubiquitous in your programs.
The most obvious case is the numbers for the colors that you provide as an input to the setpencolor command. I have trouble remembering many of the color numbers. So, what I have done is to write little procedures that output numbers corresponding to the color the procedure's identifier represents.
This binding of a number to a meaningful identifier is what's called a symbolic constant in programming terms.
Here are a few examples:
|
Once defined, the first two of these procedures can be used to provide an input to setpencolor. The colors above are some of the colors I used in my seascape program. Here is what part of my main procedure contained - the part that used the color procedures.
|
Defining the procedures blue and forest and then using them in appropriate places makes the program much easier to read. Trust me, this is good...
The symbolic constants for headings for the turtle can be used similarly. north, east, etc... procedures can be used as inputs to the setheading command. Get into the habit of starting all of your programs with symbolic constants - part of the vocabulary for the story you are about to write. Yes, think of the process of writing a program as similar to writing anything that is descriptive.
Creating Your Own Operators
The key to the above procedure definitions is the command, output. When a Logo interpreter performs an output command, it exits the procedure containing it, producing whatever output's input is - as the procedure's output. This can be confusing at first. output is not an operator. Figure 9.1 shows what happens if you try to put it where an operator is required.

|
Ok, let's move on and write some more interesting procedures which are operators.
In the previous lesson there were examples of arithmetic expressions that computed and displayed the circumference and the area of a circle. Here is one of the procedures.
|
It would be more useful to separate the println functionality from the computation piece. It's simple... Just replace println with output.
|
Notice that I changed the name of the procedure. You always want the name of the procedure to reflect what it does. This is how we achieve our abstraction.
This new procedure, now an operator, is simple to use with the println command, e.g., here is an example of its use in the CommandCenter.
|
Use the following TG applet to try it out for yourself. Type the circleCircumference definition into the Editor, then invoke it a few times in the CommandCenter to see what you get.
TG Programming Environment Applet
Practice: A Couple More Operators For You To Write
You really don't learn about something deeply by reading about it or hearing someone lecture about it - you learn by trying to do it. Here are a few exercises that you can play with.
-
In the previous lesson you wrote
printCircleArea. Write a procedure named circleArea with an
input for the radius of the circle. It should produce an output that is the area
of the circle. Test it with the inputs in Table 9.1 and make sure you get
good answers.
Table 9.1Input Area 2 12.56636 3 28.27431 5 78.53975 11 380.13239 - Part of the arithmetic expression you wrote to compute the area of a circle involved squaring a number. Squaring a number is a common thing to do. Write a procedure named square with an input :number that produces number-squared. There is also a constant value in the expression, PI, which should be defined as a symbolic constant - define the procedure PI which outputs 3.14159. Redefine your circleArea using these new procedures. Once again, test it...
After you've completed writng these procedures, check what you came up with here.
Practice: Random In Range
OK, now for an operator that would have been nice to have in one of the programs we wrote in the last lesson, RandomBoxes. To refresh your memory, we painted a bunch of solid, colored boxes at random locations on the graphics canvas. We needed a couple of random numbers in ranges other than the standard 0...x-1 provided by the random x operator. We needed random numbers in a range determined by the height and width of the graphics canvas. As an example, if the canvaswidth operator outputs 600, we needed random numbers in the range of -300 ... 300-boxWidth.
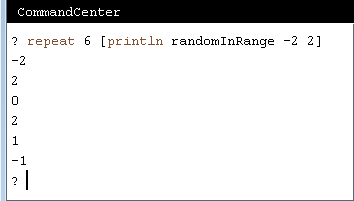
I want a new operator, let's call it randomInRange, which produces an output, a number that's in any range of numbers I provide as inputs. As an example, for the invocation "randomInRange -50 50" I want an output that is random and is greater-than or equal-to -50 AND is less-than or equal-to 50. Figure 9.2 demonstrates a working version producing random numbers in the range of -2 through 2.
|
Ok, either go off and write it or if you need a little help to get started, here's a skeleton.
|
At this point, don't hesitate to play around in the TG applet to figure out what you need to do. Follow the steps we've been using to write all of our programs.
- Understanding the Problem (figure out what you know, and what you don't know)
- Devising a Plan (write a pseudo code description of what to do, draw a plumbing diagram or diagrams to visualize what you will do)
- Carrying out the Plan - type in your source code and test it; does it work? If not, verify your code matches what you developed in step 2 and review what you came up with in steps 1 and 2.
Don't read further until you've at least made some attempt at writing the randomInRange procedure.
First hint...
If you think about it, your output needs to be at least what the input :min is given when randomInRange is invoked. Since the smallest value returned by random is 0, you are going to need to add :min to the output from random. So, our pseudocode now looks like:
|
Don't read further until you've made an attempt to complete this procedure and experimented with it
Second hint...
At this point, I suggest that you write an operator named magnitude. Here's the expanded pseudo code:
|
OK... finish the procedure.
Use repeat to test your code. If it doesn't work, help is on the way - read the next section. If your code works, congratulations! Now read the next section because it's a really cool feature you are sure to use in the future.
TRACE - A Debugging Tool
    "Failure is an integral part of success," Mead says. "You
    learn from every one of your failures.  I used to tell
    students, 'You've got to listen to the silicon. It's trying
    to tell you something.'"

    If you build something or do something and it doesn't work
    out, he says you can curse and swear at it. Or, you can learn
    from it.

    "The physical world is perfectly willing to share with you
    how it works. If you listen. But, if you have your mind made
    up, you can go for years and not hear it," Mead says.

                     from an article in Investors Business Daily
                     May 13, 2003
Time for you to learn more about tracing in TG. It can help you understand what's happening when your program is being executed and not doing what you expect. Remember, trace is a directive you enter into the CommandCenter. it's similar to a command, but can't be placed into the body of a procedure. It directs TG to print out very useful stuff as your program is executed.
So, once you have your magnitude and randomInRange procedures entered into the Editor, switch keyboard focus to the CommandCenter and type:
|
Since TG has been directed to trace the procedure magnitude, what you should see is somthing like:
|
TG let you know that magnitude was invoked with the inputs: -4 and 4. It's body was executed and its output was 8.
Well, with this information, you can see that there is a problem with the code I gave you. There's a bug in it. randomInRange -4 4 will never output a 4 (the value provided for the :max input in our trial).
random 8 outputs a number in the range 0 - 7. To get an output of 4 we need to give random an input equal to the output of magnitude plus 1.
Fix the bug (if you hadn't discovered it and fixed it on your own)...
Finally, modify your program from the last lesson that draws boxes at random locations so that it uses randomInRange. Also add symbolic constants where appropriate... Use them to make your program more readable.
You may want to use an operator that TG's interpreter understands that we have not talked about yet. You may not need it, but I used it. Table 9.1 gives you the scoop on minus which simply takes a number and negates it, just like multiplying the number by -1.
| Command | Inputs | Description |
| MINUS | number | Outputs the negative of number | |
Project: A Grid Toolkit
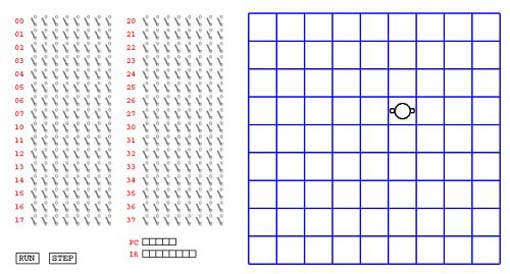
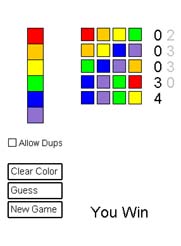
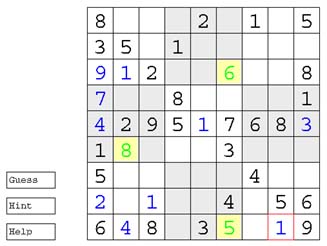
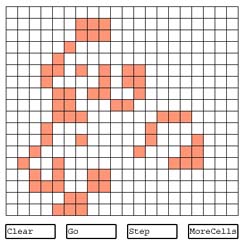
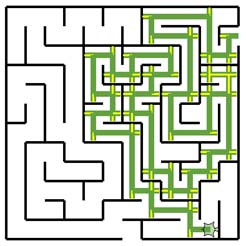
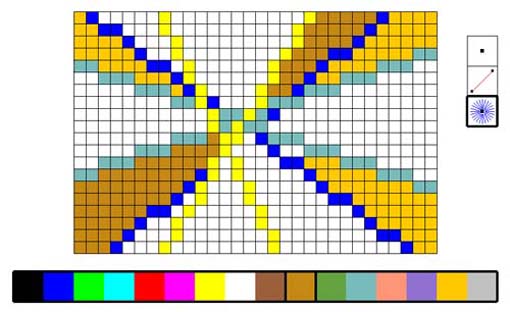
The reason that I have had you drawing axes and grids in many of the previous lessons is that they are very common in programs. Here are some windows which I captured; they are, top-to-bottom, left-to-right:
|
|
|
|
|
|
|
|
Each of these programs contains at least one graphical object that is grid-like. I am going to take our use of abstraction to another level. We are going to write a bunch of procedures that provide stuff we will need in many programs. We are going to get started creating a GridToolkit.
A Grid Toolkit Contract
The first thing I'm going to do is write the rules for using the GridToolkit. These rules are going to be its contract. We will follow the rules when we write the procedures in the toolkit. And... we will follow the rules when we use the procedures in the toolkit in our programs. I talked a bit about contracts, as they applied to a single procedure, when I introduced defining you own procedures. Our first GridToolkit rules will be
- Definition: our grid is a bunch of squares, all of equal size, arranged in rows, each with an equal number of columns
- Definition: the squares making up our grid will be called cells
- All procedures in the toolkit will have names starting with "grid"
-
A cell can be identified in one of two ways:
-
by its row and column numbers. Rows are ordered from top to bottom,
with the top row numbered zero. Columns are ordered left to right
with the leftmost column numbered zero.
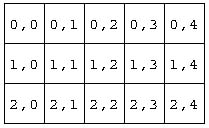
-
by its index. the index (number) of the top-left cell is zero and
then indicies increase left-to-right and then top-to-bottom.
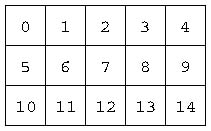
-
by its row and column numbers. Rows are ordered from top to bottom,
with the top row numbered zero. Columns are ordered left to right
with the leftmost column numbered zero.
The Grid Toolkit Source Code
Given these rules, here are the procedures that make up our first pass at a GridToolkit.
|
Checkout the Grid Toolkit
If you have the TG programming environment on your computer, copy & paste the GridToolkit source code into TG's Editor so that you can play with it. If you want to use the TG applet on this web page to play, use the "loadcode GridToolkit_9.jlogo" directive in the CommandCenter to get the source code in the Editor.
It has initial default values in place in all of the procedures acting as symbolic constants. These will be changed as necessary in programs that you write that includes the GridToolkit. But, with the default values in place, you can display a grid by invoking a single procedure: gridPaint. Then you can paint individual cells by invoking gridCellFill with two inputs, the cell's index and the color number it is to be filled with. Add the following code after the GridToolkit stuff in the Editor or type it into the CommandCenter.
|
Then try filling random cells with random colors; here's an instruction that does this.
|
Play with the code... change some symbolic constants like the size of the cells, the number of rows and or columns...
Why the Gift?
So, why did I give you all of the source code for the GridToolkit without making you work for it?
Answer: you will learn a lot by reading someone else's source code.
Long ago, when I was convinced that Logo was a much better language to to use to introduce programming concepts than Java, the first thing I did was to read a lot of Logo source code. Fortunately for me, there is a lot of it available. Brian Harvey's Computer Science, Logo Style books, available free on-line, are a great introduction. See the ItP acknowledgements page for additional sources of great Logo programs.
Now it's your turn to read some code. Read through the GridToolkit source code. Use it to complete the following project.
Draw Balls in the Cells
Write a procedure that draws a colored ball in the center of a specified cell. Then use it and procedures in the GridToolkit to write a program which draws random colored balls in random cells. Here is an example of what my program painted in the graphics canvas.
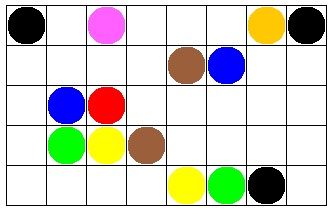
I used a repeat command to paint 20 randomly colored balls into 20 random cells.
repeat 20 [ gridGotoCellCtr random gridNumCells drawBall ballSize random 16 ]
Stamp Turtle Shapes in the Cells
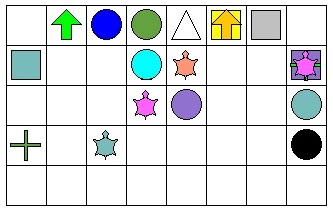
Write a procedure that sets the shape of the turtle to a random one. Read about the stamp command using the help directive in the CommandCenter and then use it to paint shapes in random cells. Here is an example of what my program painted in the graphics canvas.
Two New Built-in Operators - Why?
In the GridToolkit, I used two built-in operators that you have not seen before. What are they? Why did I need to use them?
Why Count Starting With Zero?
In GridToolkit, rows and columns were numbered starting with zero instead of one. The index that is used to identify a particular cell also started with the first cell numbered zero. This convention has been in place for decades in the world of computer programming.
The reason is that this simplifies the code. Can you find the code in our GridWorld which is simpler than it would have to be if we started numbering the index at one instead of zero? How would the code need to be changed if the base was one instead of zero?
Summary
We've made another quantum jump in how we can reduce the complexity of the programs we write. You now know how to define your own operators, procedures which output values. Symbolic constants, a very simple form of a user-defined operator, can make your programs much more readable. And, binding meaningful names to complex expressions, is just one more use of abstraction, an approach to writing programs that are much more easily understood. And, the side benefit is that a program that is easy to read, that's easily understood. is that it will probably do what you want, what you intended it to do.
Go to the Table of Contents
On to Words & Sentences
