Background
Logo Programming
- Commanding a Turtle
- Pseudocode
- Adding New Commands
- Iteration & Animation
- Hierarchical Structure
- Procedure Inputs
- Operators & Expressions
- Defining Operators
- Words & Sentences
- User Interface Events
- What If? (Predicates)
- Recursion
- Local Variables
- Global Variables
- Word/Sentence Iteration
- Mastermind Project
- Turtles As Actors
- Arrays
- File Input/Output
- AI: Pitcher Problem Solver
Java
- A Java Program
- What's a Class?
- Extending Existing Classes
- Types
- Turtle Graphics
- Control Flow
- User Interface Events
Appendices
- Jargon
- What Is TG?
- TG Directives
- jLogo Primitives
- TG Editor
- Java Tables
- Example Programs
- *** New ***:
Installation Notes
Updates
- December 13, 2008
- March 7, 2009
- January 6, 2012
- March 15, 2013
- January 20, 2014
- February 13, 2014
- July 29, 2014
- January 18, 2016
- January 29, 2016
- August 19, 2016
Lastly
Iteration and Animation
Introduction
We worked our way through defining procedures in the last lesson so that our programs could be built in small, understandable pieces. The smaller your programs are, the less you type and the better chance your program will do what you want it to do. In this lesson, you are going to learn about another powerful mechanism for writing smaller programs: iteration.
As you write more Logo programs, you will notice that to do certain things, your code repeats similar patterns. Programming involves recognizing these patterns. There are a few ways to reduce the number of duplicate instructions your programs contain. Iteration is one which we cover in this lesson.
We'll end this lesson with an introduction to animation. Animation is everywhere in the digital world. In Appendix G there is a reference to the SolveMaze jLogo program which draws a maze and then solves it. It shows off the solution via animation. In this lesson you will learn how to perform simple animation.
Drawing a Circle, Step by Step, Point by Point
You may think that drawing a circle requires understanding some advanced mathematics like algebra, geometry or trigonometry - subjects which you may not have had in school yet. Don't worry if you have little to no experience with any of these subjects. We are going to get the turtle to draw a circle in this lesson. We'll figure out how to do it the same way we solve many puzzles - start by working with things we know how to do.
Here are a couple of definitions of a circle:
     A closed plane curve every point of which is equidistant
     from a fixed point within the curve.
     (Webster's New Collegiate Dictionary).

     A circle is the set of all points in a plane at a fixed
     distance from a fixed point in the plane.
     (www.math.psu.edu)
In the past two lessons we have started out writing our algorithms, our programs, in pseudocode. Here is some pseudocode that instructs the turtle to draw a bunch of points that are all the same distance from the center of TG's graphics canvas. Here is our algorithm for drawing a circle.
- pick up the pen so it's not leaving a trace,
- move some number of steps forward, for example: 100,
- put the pen down so it will draw,
- move a few steps forward to make a little mark,
- pick up the pen so it's not leaving a trace,
- return to the original position,
- turn a bit to the right, and
- repeat steps 1 through 7 until the turtle is back to its original heading - until it has rotated 360 degrees.
Given this pseudocode, our next step is to extend Logo's set of primitive procedures, creating our own new procedures providing higher level utilities. Each line or some group of lines of pseudocode is converted into procedures that we define. The names of our new procedures are abbreviations for what the pseudocode describes; they need to be carefully chosen to reflect what the new procedure does.
Let's define a new procedure named pointOut100. It should draw a point 100 turtle steps outward (forward on the current heading) from the turtle's current position. It implements steps one through six in the list above.
Use the pseudocode description above to write your own version of pointOut100. and test it. Get something working... Here's the TG applet.
TG Programming Environment Applet
Tip: The left mouse button can be used to change the heights of the graphics canvas, the CommandCenter, and the Editor. Hold the left mouse button down while on the namestripe between these subwindows and drag it up/down.
Tip: When you press the up-arrow key while you are working in the CommandCenter, it brings up the previous line of input. Press it again and you will get the line before this. This continues until some maximum number of saved lines is reached.
Once you've completed your pointOut100 procedure which draws a point, you can combine it with a left or right Logo primitive, both on a single line in the CommandCenter, and repeat it using the up-arrow key.
I think what you will find is that it is going to take a lot of typing. A LOT of typing. Too much typing. Given the procedure we defined, we reduced the size of the code quite a bit - imagine if every line had all the stuff in the procedure's body...
Here's how I approached the exercise.
|
Then in the CommandCenter, I entered the line of instructions:
|
a bunch of times, 18 times to be exact, 18 times 20 degrees equals 360 degrees (full circle).
There is one command in this source code that you may not have used yet, setpensize. It was mentioned in the Exploration - Additional Commands section of the Commanding a Turtle lesson. setpensize takes an integer as an input and sets the width of the line drawn by the turtle's pen to be this number of turtle steps. By setting the width of the pen to 30 steps and using it to draw a line 30 steps long, I get a big solid colored box - a BIG point!
Walking in a Circle
      Let us imagine, then, as I have seen a hundred times, a
      child who demands: How can I make the Turtle draw a circle?
      The instructor in a LOGO environment does not provide
      answers to such questions but rather introduces the child
      to a method for solving not only this problem but a large
      class of others as well.  This method is summed up in the
      phrase "play Turtle."  The child is encouraged to move his
      or her body as the Turtle on the screen must move in order
      to make the desired pattern.  For the child who wanted to
      make a circle, moving in a circle might lead to a descrip-
      tion such as: "When you walk in a circle you take a little
      step forward and you turn a little. And you keep doing it."
      From this description it is only a small step to a formal
      Turtle program.
			  (Seymour Papert, in "Mindstorms")
A principal idea behind the creation of Logo was to embed students in an environment in which they can explore for solutions. Seymour wanted students to learn mathematics by spending time in Mathland. Rather than learning concepts by doing problems from some textbook, students could learn concepts by exploring them in a virtual world, a Mathland. In the quoted paragraph above, students would discover how to make the turtle draw a circle by physically acting out the process themselves and then translating what they did into Logo instructions for the turtle.
You can think of the description of the process of walking in a circle, take a little step forward and turn a little, as pseudocode, as another algorithm for drawing a circle.
Use the TG application if you have it or go back up to the TG applet to convert this pseudocode into Logo instructions. Experiment with different distances to move forward as well as different amounts of turning right or left. Go play in Mathland. Do not continue reading on until you have instructed the turtle to draw a few circles.
What may have appeared to be a game was actually some serious exploration of mathematics. What I wanted you to discover, or verify if you already knew a bit about geometry, is that you can get the turtle to draw a circle by moving forward in increments as you also turn right or left in increments. To complete the circle, the sum of all the amounts you turned the turtle must add up to 360 degrees. Did you enter a symmetrical series of instructions something like the following?
|
If you didn't, try them out now. There are two crucial, distinctive elements to this list of instructions.
- All of the forward instructions had the same distance and all of the right instructions had rotations of the same amount.
- Since the amount rotated in each right instruction was 30 (degrees), the list of instructions consisted of exactly 12 pairs of forward and right instructions (12 times 30 equals 360).
What is actually drawn is a regular dodecagon - a 12-sided regular polygon. Regular polygons and circles have a very interesting history, dating back over 2,200 years! Archimedes used the geometry of regular polygons to estimate π (Pi), the ratio of the circumference of a circle to its diameter. Archimedes knew how to compute the perimeter of a regular polygon and noticed that the more sides a regular polygon had, the closer is was to being a circle. To see this for yourself, click here to go to a webpage that covers regular polygons.
Regular Polygons Applet
So let's take advantage of this convergence of many-sided regular polygons and a circle and define a new procedure that draws a 36-sided regular polygon. Luckily, the Editor has copy & paste.
|
And... you have what looks like a reasonable circle. And you've achieved this with what started out as an observation of how you would walk in a circle. But with the Logo programming environment, you were able to explore this concept. And in the process, either you learned a bit more about math (geometry), or at least visualized what you already knew.
Summary of Drawing a Circle
You should now know two ways to get the turtle to draw a circle in the Logo programming language. A problem with both approaches is that they take a LOT of typing. And what you are typing is a lot of the same stuff, over, and over.
The first way we approached the problem required drawing points some distance from the center of the circle. If you think back about what we did in this approach, you will see that if we draw one point for each degree in a circle; it will take 2,161 instructions. If you define the procedure pointOut100, you reduce your program to 2 times the number of points that are drawn. So if we want a circle drawn as a thin line, we would probably need to draw at least 360 points, requiring 720 instructions.
Our second approach was much shorter, but still contained a lot of redundant instructions. reg36gon contained 36 pairs of identical forward and right commands.
There's got to be a better way...
And there is... it's called iteration.
Iteration, aka Repeating Something
In the Summary section of the "Commanding a Turtle" lesson, I emphasized that the sequence that the steps in our programs get done in is extremely important. In the TG applet (or TG application), when you are working in the CommandCenter, instructions (the steps in your program) are performed left to right after you press the [Enter] key, completing a line. When you enter source code into the Editor, it will be performed line by line, starting with the first line and completing when the last line has been performed. The instructions on each line are performed left to right, like in the CommandCenter.
Well, Logo has a way for you to tell the interpreter to perform of a list of instructions some number of times. The syntax of the Logo repeat command is:
| repeat | <number> | <List-of-Instructions> |
- the command name: repeat
- a <number>, and
- a <List-of-Instructions>
And, the syntax of a <List-of-Instructions> is:
| [ | <Instructions> | ] |
- an open square bracket,
- <Instructions>, and
- a close square bracket
For example, here are repeat instructions which draw regular polygons:
| repeat | 3 | [ | forward 100 right 120 | ] |
| repeat | 4 | [ | forward 90 right 90 | ] |
| repeat | 5 | [ | forward 80 right 72 | ] |
| repeat | 6 | [ | forward 70 right 60 | ] |
| |
||||
The initial version of reg36gon is now down to
|
Logo Interpreter Animation - Watching Iteration
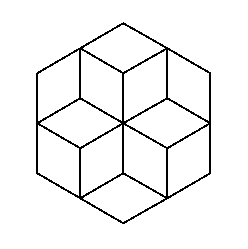
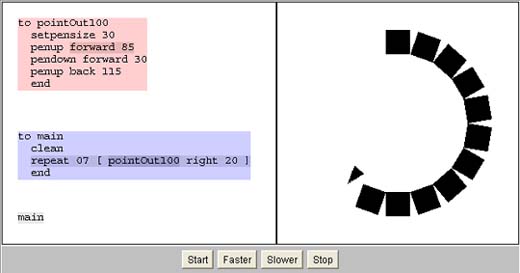 Figure 5.1
Here is an applet that demonstrates the execution of a small program which draws a circle the way I first described. If you are having any trouble visualizing how the repeat command works, watch it in action...
Nested REPEAT
To show off just how powerful repeat can be, here are a few drawings; each was made with a single Logo instruction. The instruction has a repeat command nested inside the <List-of-Instructions> of an outer repeat command.
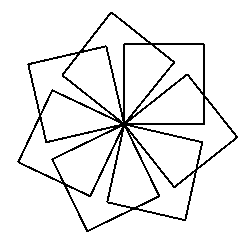
|
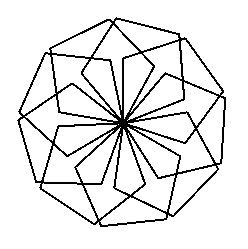
|
|
The leftmost drawing is seven rotated squares. The center drawing is nine rotated regular pentagons. The rightmost drawing is six regular hexagons.
Here are the instructions that produced the drawings.
|
Use the TG application if you have it on your computer or go back up to the TG applet and play with these instructions. Once you understand how they are working, create your own drawings by changing the inputs.
Simple Animation - Movement On the Graphics Canvas
Writing a program that does some sort of animation is actually easy now that we have the repeat command and combine it with throttle. With throttle you watched the turtle perform what you told it to do, in slow motion. Let's combine it with repeat to watch the turtle walk around in a circle. Use the TG application if you have it on your computer or go back up to the TG applet and enter the following:
|
LOADPICTURE and SETSHAPE Commands
The capability for using the turtle as an active element of a program is very powerful, especially since you can change its appearance. The setshape command takes a number as an input. Figure 5.3 shows the numbers and their cooresponding shapes. Like the default shape (the turtle), these shapes can change color via the setpencolor command.
| 0 | 1 | 2 | 3 | 4 | 5 | 6 |
 |
|
 |
 |
 |
 |
 |
Here is a program that shows how to change the turtle's shape into a red ball. It then uses throttle and repeat to move the ball off the graphics canvas. To provide some context, it uses loadpicture to make the background a girl in a throwing position. If you did the first exercise in lesson 2 (Commanding a Turtle), you have already used loadpicture. It's input is unlike the others you've seen so far; it is the name of a file preceeded by a quotation mark.
|

|
Type this program into the TG applet above and watch what it does. If you have TG installed on your computer, you will need to copy the image file (GirlThrowing.jpg) from the BFOIT website. How you can do this is explained in Appendix H (Installation of TG)
LOADSHAPE Command
What if the shape we want the turtle to take is not one of the built-in shapes described above?
Like the loadpicture command, the loadshape command reads a picture file into TG. The difference is that loadpicture also paints the picture into the background of the graphics canvas; the loadshape command just associates the picture with a shape number supplied as a second input. You can then use this new shape number as an input to the setshape command and the turtle will take on the appearance of the picture.
Go to the TG applet above and type in the following two instructions into the CommandCenter.
   loadshape "Bat.png 32
   setshape 32
The turtle will take on the image of a bat. Move it around; watch what happens.
And now to get back to animation. Here is another program to type in. In this case instead of a red ball, you animate what looks more like a baseball.
|
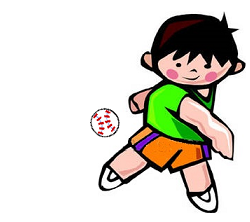
|
Animating Drawings
What if we want to animate something that we get the turtle to draw, not animate the turtle itself?
In this case, simple animated movement of an object consists of the steps:
- draw an object,
- pause for some small amount of time,
- erase the object by drawing it again in the background color,
- do something which effects the object's appearance, e.g., move the turtle a bit, and
- go back to step 1.
But... notice something new we need to know how to do. When we used the turtle's image as the object being animated, we used the throttle command to control the pace of animation. But now that we want the turtle to draw something, we need the graphics to be performed at full speed when drawing the object. But, we need some other way to take a break between drawing the object and erasing the object.
Checkout the wait command. It has an input, a number, the amount of time to wait before the next instruction is performed. This number specifies the amount of time in milliseconds (1/1000s of a second) to wait.
Practice: Jumpin Jack or Jill
Ok. Figure 5.4 shows three different positions of a stick figure performing a common exercise.
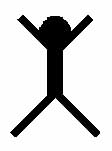 |
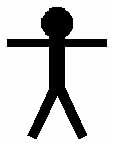 |
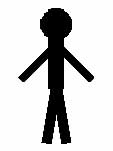 |
| |
|
|
Here is part of the source code including everything for drawing JumpinJack #1.
|
It's up to you to write procedures: arms2, legs2, fig2, arms3, legs3, fig3 and then modify main such that it iterates through the three figures to animate Jack, or is it Jill???
Tip: If you decide to copy&paste arms1 as a prototype for arms2 and arms3, make sure to change everything that needs to be changed. This means reading the code carefully... This applies to the legs and fig procedures as well. If any of the procedures are confusing to you, play with them out in the CommandCenter to see what they do.
Tip: When you have everything you need for figure #2, test out your fig2 procedure by typing its name in the CommandCenter. The great thing about working in an interpreted language is that you can try all sorts of things out, without modifying your program to get the desired effects. Figure 5.5 shows how I tested my program during its development. Look carefully at what I entered in the CommandCenter and what the graphic results were.
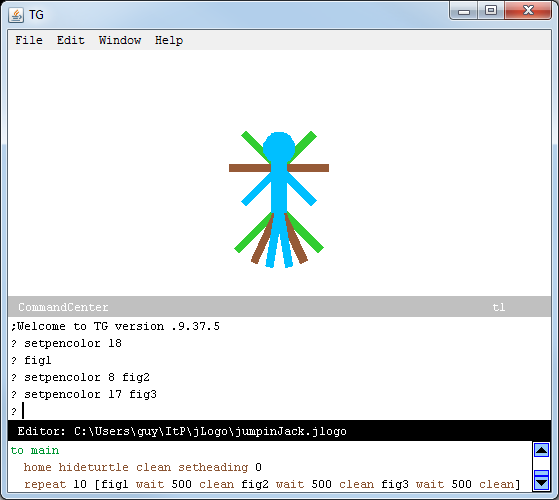 Figure 5.5
Review: Once you have your program working, take out a wait instruction and watch what happens. Put it back in and change its input number. Play around with wait until you understand what it is doing for you.
Practice: Additional Projects
Back in the exercises at the end of the second lesson, you were asked to draw a pair of axes like shown in Figure 5.6. Now that you know how to define new procedures and use the repeat command, you should be able to write a much smaller version of this program.
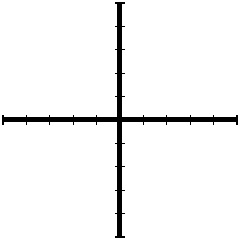 Figure 5.6
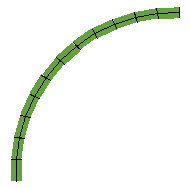
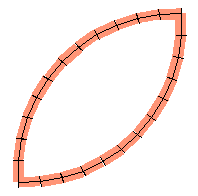
Take a look at the circular arc in Figure 5.7a. This particular arc is one quarter of a circle. You've learned how to draw a circle in this lesson, so write a new procedure named drawArc which instructs the turtle to draw a circular arc that is a quarter of a circle in length. Then, use your drawArc procedure in a second new procedure named dualArcs which draws something that looks like Figure 5.7b.
Now take a close look at the plant with a flower in Figure 5.7c.. Use your new procedures to draw the flower. Then, expand your program to draw the stem and the leaf - completing a plant with a flower.
 |
 |
 |
| |
|
|
Write a bunch of new versions of drawArc (named drawRedArc, drawOrangeArc, etc...) that cover half of a circle, 180 degrees. Each should be colored representing a band of a rainbow. Then write a main procedure that puts a rainbow together.
 |
| |
Checkout the brick wall drawn in Figure 5.9. Write two new procedures, procedures which instruct the turtle to draw a brick and a half-brick. Use these new procedures to draw the brick wall.
Warning: this is a bit tricky :)
 Figure 5.9
Summary
Iteration - repeating something some number of times - is a powerful way to reduce the size of a computer program as well as making the purpose of the code more obvious. The repetition may not be obvious when you start writing a program; the something that gets repeated can be a pattern you only recognize when you are typing in your program. So, look closely for patterns in the code you write. As you get more and more experience writing programs, you'll start to think about iteration as a basic building block of programming.
If you found the topic of regular polygons interesting and want to learn more about their relationship to circles and π and/or how Archimedes estimated the value of π, go to the library and checkout pages 23-32 of William Dunham's book The Mathematical Universe.
Go to the Table of Contents
On to Hierarchical Structure
