Background
jLogo Programming
- Commanding a Turtle
- Pseudocode
- Adding New Commands
- Iteration & Animation
- Hierarchical Structure
- Procedure Inputs
- Operators & Expressions
- Defining Operators
- Words & Sentences
- User Interface Events
- What If? (Predicates)
- Recursion
- Local Variables
- Global Variables
- Word/Sentence Iteration
- Mastermind Project
- Turtles As Actors
- Arrays
- File Input/Output
- AI: Pitcher Problem Solver
Java
- A Java Program
- What's a Class?
- Extending Existing Classes
- Types
- Turtle Graphics
- Control Flow
- User Interface Events
Appendices
- Jargon
- What Is TG?
- TG Directives
- jLogo Primitives
- TG Editor
- Java Tables
- Example Programs
- *** New ***:
Installation Notes
Updates
- December 13, 2008
- March 7, 2009
- January 6, 2012
- March 15, 2013
- January 20, 2014
- February 13, 2014
- July 29, 2014
- January 18, 2016
- January 29, 2016
- August 19, 2016
Lastly

Hierarchical Structure
Introduction
    hierarchy n 1: ...organized into orders or ranks each subordinate
	   to the one above it ... 4: a graded or ranked series.
			      ( Webster's New Collegiate Dictionary )

    A hierarchy (...) is a system of ranking and organizing things or
    people, where each element of the system (except for the top
    element) is subordinate to a single other element.
							( WikipediA )
In this lesson, we are going to extend the power of abstraction by orders of magnitude. You will learn the importance of the hierarchical organization of procedures It makes your programs easier to write. Programs that you write in a clear, hierarchical manner are easier to read, modify, and extend. Again, so that they do what you want.
      Plans are something like little computer programs that
      program the mind to perform certain cognitive tasks, such
      as long division, brushing your teeth,... simple plans can
      be embedded in more complex plans to produce a hierarchical
      control system. For example, the plan of making pancakes
      includes the plan of preparing the batter, which includes
      the plan of measuring out a precise quantity of milk,
      which requires getting a measuring cup from the drawer,
      placing the cup on a surface. getting the milk from the
      refrigerator, puting it into the cup until it reaches a
      certain mark, and so on.

		(Cognitive Psychology, Wayne Wickelgren, p. 357)
Building things in hierarchies is very common in engineering. One example you may be familiar with is the file systems provided by operating systems. File systems have a top-level, often referred to as the root of the file system. Under the root, there are subdirectories like "Program Files" and "Documents and Settings" and under these are more subdirectories.
Hierarchical Structure - Why It's Important
In a hierarchical structure there is a grouping of things into levels. There is a "top" level and then a series of lower levels under it. It's all about abstraction. At each level you describe a concept with enough detail for you to have a good feel for what lies below it. Here's a snipet from Brian Harvey's course notes, Reading Material for: CS 61A, for his first class.
	 The big idea of the course is abstraction: inventing languages
	 that let us talk more nearly in a problem's own terms and less
	 in terms of the computer's mechanisms or capabilities.  There
	 is a hierarchy of abstraction:
| Application programs |
| High-level language (Scheme) |
| Low-level language (C) |
| Machine language |
| Architecture (registers, memory, arithmetic unit, etc) |
| circuit elements (gates) |
| transistors |
| solid-state physics |
| quantum mechanics |
	 ... all are important but we want to start at the highest level
	 to get you thinking right.
The main thing I want you to understand from this is that properly defined levels in a hierarchy allow you to work in any one level with little or even no knowledge of any other level. Each level is an abstraction of some idea, concept, classification. With abstraction and hierarchy, a programmer does not need to know how any command does what it is documented to do - just that it does it. Hierarchy lets a programmer build more and more complicated structures, one on top of the other.
Let's write a program in a hierarchical manner, to demonstrate the point.
Drawing a Street of Houses
Figure 6.1 shows a static call graph of the DrawStreet program. In it you can see the hierarchical structure.
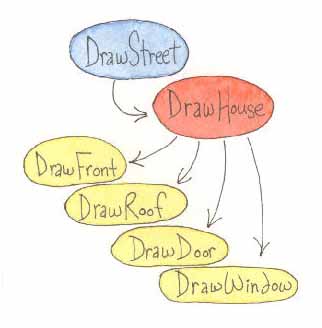 Figure 6.1
At the highest level in the program's hierarchy, all we have to know about is the procedure: drawHouse. Given it, the street is drawn as a line of houses.
And, the only thing that someone needs to know in order to modify this program to draw a different set of houses is what the inputs to drawHouse are. There is no need to know even a single primitive procedure! This is very powerful and is at the heart of all computer programming.
At the end of the Adding New Commands lesson, where you learned how to define new procedures, you were asked to rewrite your drawHouse program. You were to define new procedures named:
- drawFront,
- drawRoof,
- drawDoor, and
- drawWindow.
You then used them in a program which drew the house. What we will do now is make most of this program a procedure. Here is my version of a new procedure - drawHouse.
|
drawHouse consists of some initialization, invocations of the new procedures and Logo primitives (to position the turtle) . For consistency, all of my drawXxxx procedures assume the turtle is at the lower-left corner of the thing to be drawn. It is assumed to be pointed north. For consistency, the turtle is always returned to this location when drawing is complete. But, just to make sure all goes well, the first thing drawHouse does it some initialization - code that insures the pen is DOWN and that the turtle is heading north.
Now that we have drawHouse, we can use it without any concern about how it draws the door, the roof, anything. So, to draw a street of houses, we only need to know about drawHouse. Here's my version of a new procedure which draws a street of houses.
|
What we now have is a layer-cake of three levels of abstraction, a hierarchy that looks like Figure 6.2.
| |
| |
| drawDoor, drawFront, drawRoof, drawWindow |
The comments included with each new procedure's definition is the contract that the procedure commits to. Given these contracts, any changes that you make at any level in the hierarchy should not effect any other level. As an example, in drawHouse we could position the window on the left and the door on the right, swap them; or, we could add a second window on the left and center the door. These changes would work without breaking anything. This is a key to writing programs which can change/grow over their lifetime.
So, what's left? Well, our program needs to do some initialization which positions the turtle where we want the houses. We need an additional top level; the icing on the cake.
Remember the main... Procedure
There is one more procedure that I've been mentioning since we learned to define our own procedures, one that you should always write. Its name is main.
Why? What should it do?
What a procedure named main should do is to first initialize stuff and then invoke the top-level procedure(s) in your program's hierarchy.
So, what do you initialize? It is a good practice to make sure stuff is just like it is when you first start the TG programming environment. There is the graphics canvas. It should be cleared. Then there is the turtle. It should be visible in the center of the canvas, facing north, with a black pen, etc... You need to set the state of stuff in your program such that it is what the rest of your program is expecting.
Of course, much of the time you want the program's initial state to be slightly different than how TG has stuff when it's started. This is fine too. For example, when TG starts up the pen is 2 turtle steps wide and you might prefer a thinner or thicker pen. Things to consider when you are writing your initialization code, setting your program's initial state, are: as:
- the graphics canvas - clear it or set its background color to some non-white value or fill it with an image using loadpicture
- make sure the turtle is visible or invisible (visible is nice when you are using setshape or debugging, invisible speeds up graphics)
- position the turtle where you want it in the graphics canvas
- which direction should the turtle be facing
- what state you want for the turtle's pen (its color, width, and whether it is up or down)
Writing programs in TG is highly interactive. As you try things out, write procedures and invoke them, you modify TG's state. You move the turtle around; you change its heading; you change the color of its pen; etc... Testing parts of your program as you write them is great; this helps you write a correct program fast. But, a well written program has a known starting point and state and this is main's purpose.
The last thing that main should do is to invoke the top-level procedure(s) in your hierarchy. Here's an example main procedure for use with drawStreet.
|
Figure 6.3 shows what you get when you run the completed program.
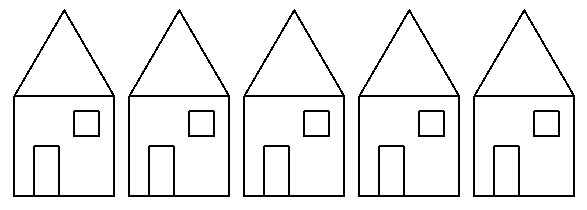 Figure 6.3
Finally, what's with the name: main? I've chosen this name because it is also the required starting procedure for programs written in the programming languages: C, C++, and Java.
Practice: Islamic Art
	    In art, a motif is a repeated idea, pattern, or theme.
	    Many designs in mosques in Islam culture are motifs,
	    especially those of flowers.	    ( WikipediA )
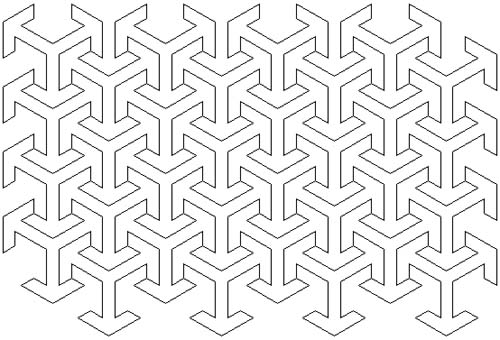 Figure 6.4
Checkout the artwork in Figure 6.4. What looks to be a complex and elaborate piece of work is really simply a repeated motif. The motif is drawn in a grid consisting of eight rows and eight columns; look closely, at first glance it looks to contain only four columns and rows.
Figure 6.5 shows one blown-up motif with a highlighted arrow.
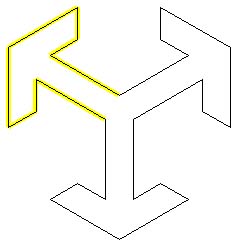 Figure 6.5
This motif, which looks a bit like a 3D cube, is actually a symmetric assembly of three arrows, the points of which are at 120 degree intervals. In TurtleSpace, the right arrow is pointing at 60 degrees, the center arrow at 180 degrees, and the left arrow at 300 degrees.
Figure 6.6 shows one blown-up arrow.
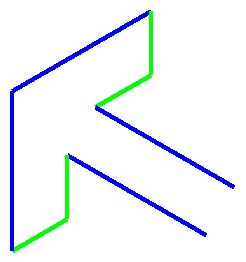 Figure 6.6
Figure 6.6 shows an arrow, again doubled in size versus the arrows in the motif. This arrow can be broken down into two halves, four-line-segments, each the reflection of the other.
So, there is a distinct hierarchy to the program we need to write. And, this is the reason I picked this piece of art to explore. Figure 6.7 is the layer cake of this program's hierarchy.
| |
| |
| |
| |
| drawLeftSide and drawRightSide |
Even though our hierarchy is simple, the mathematics behind this art is not. The relation of the lengths of the two line segments actually requires knowing the special properties of 30-60-90 degree triangles. Since this lesson is not a geometry exercise, I am going to give you all you need to know to draw an arrow and then a motif. Figure 6.8 and Table 6.1 contains all the you need. I'm also including additional details in Figure 6.8 in case anyone wants to explore, discover the details, the beautiful geometry behind the art.
 Figure 6.8
| |
|||
| Which Segment | Fig. 6.3 | Fig. 6.4 | Fig. 6.5 |
| AB and DG (blue) | 40 | 80 | 160 |
| BC, CD, and GH (green) | 16 | 32 | 64 |
| BH, DE, and FG (tan) | 8 | 16 | 32 |
| |
|||
| Which Angle | Angle in Degrees | ||
| ABC | 60 | ||
| BCD | 120 | ||
| CDE | 60 | ||
Let's get started; here are drawLeftSide, drawRightSide, and drawArrow.
|
If you type in the definitions of drawLeftSide and drawRightSide and then enter the instructions that make up the body of drawArrow, you will see that the way this works. First it draws the left side of an arrow, then the turtle rotates a bit, and then the right side of the arrow is drawn.
I have a problem with this; drawLeftSide and drawRightSide are not symmetric. One expects the turtle to start at the base of the arrow and the other starts drawing at the arrow's tip. So even though there appears to be a nice hierarchy in the way we think about breaking up our program into pieces, when it comes to writing the program, the result is awkward (at least to me). So, what I decided to do was to scrap the lowest level of my hierarchy and just start with drawArrow as my lowest level procedure. I'll add comments inside it to make it clear which instructions draw the left half and which draw the right half. Here it is:
|
OK, your turn. Define a new command that draws a complete motif, three arrows pointing in the proper directions (pointing at 60, 180, and 300 degrees in TurtleSpace.
Once you get this working, it's time to move on to drawing a complete column or row (see Figure 6.7, the hierarchy). I have chosen to draw columns. Once you have drawMotif working, the only thing that's needed to draw a column of motif is iteration, the proper repeat command like we learned in the previous lesson. I need something along the lines of
|
where:
- number_1 is the count of motifs in the column,
- number_2 is the distance to move up from one motif's starting/finishing point to the next starting point, and
- number_3 is the total amount moved up (northward) in the process of drawing the column.
Number_2 is the only one that's a bit hard to figure out. Again, since this is not a geometry lesson, I'll give you good values for it. It turns out that the distance is 4.5 times the length of the short segment (green segment) of the arrow. Table 6.2 contains segment lengths pre-computed for you. As an example, if the short segment in your arrow is 16 turtle steps, the long segment in your arrow must be 40 turtle steps and the distance between motifs is 72 turtle steps.
| |
|||
| Arrow Green Segment | Arrow Blue Segment | Distance Between Motifs | |
| 8 | 20 | 36 | |
| 16 | 40 | 72 | |
| 32 | 80 | 144 | |
If you are interested in why the distance between the motifs is 4.5 times the short segment length, Figure 6.9 is included for you. Once again, the special properties of 30-60-90 degree triangles demonstrate how two motifs fit together. Line segment AF is the distance we are interested in. As it turns out, it is equal to the length of the long segment of an arrow plus two short segments.
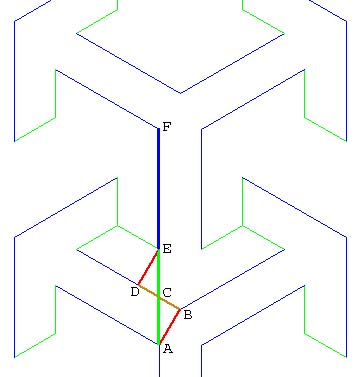 Figure 6.9
Number_1 can be anything we want; it is limited by the height of the display on our computer. Number_3 is also easy, it's Number_2 multiplied by Number_1. Here is my drawColumn.
|
And with this working, I'm going to leave it up to you to finish the project. The basic piece missing is iteration needed to draw all of the columns you want.
I'll give you a clue; if you look closely at the final drawing (Figure 6.4), you'll see that the distance to move from one column to the next column is the same as moving from one motif to the next motif in a column.There is a lot of flexibility in finishing the program; the static call graph of my solution is shown in Figure 6.10.
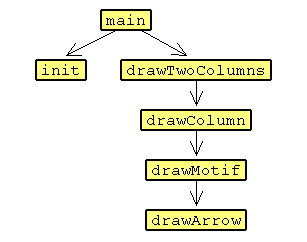 Figure 6.10
Practice:
Another Islamic Art Project
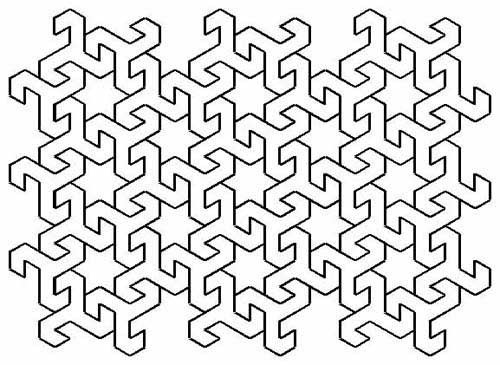 Figure 6.11
Summary
You have learned how to use abstraction to your benefit when writing more complex programs. Your programs are built in levels, as in layers of a cake. Each layer does one thing. Higher levels use things that are provided by lower levels, very often the one just below it.
Take a bit of time to examine things around you. Hierarchical development is a major tool in the engineering of everything constructed. Think back about problems you've solved in the past. Hierarchical decomposition of the initial situation is often necessary in order to understand the problem, before you can even start thinking about the solution.
Learn to think hierarchically!
You also were exposed to a new word - invoke. The word is used to refer to asking the Logo interpreter to perform a procedure that you have defined. Once you defined drawRoof, you then invoked it in the definition of drawHouse. Once drawHouse was defined, it was invoked in drawStreet, etc... Historically, the term invoke has had a variety of names; it means the same thing as the Fortran term CALL, a type of statement in the language. Calling some procedure that you have defined means the same thing as invoking the procedure.
Go to the Table of Contents
On to Inputs
